


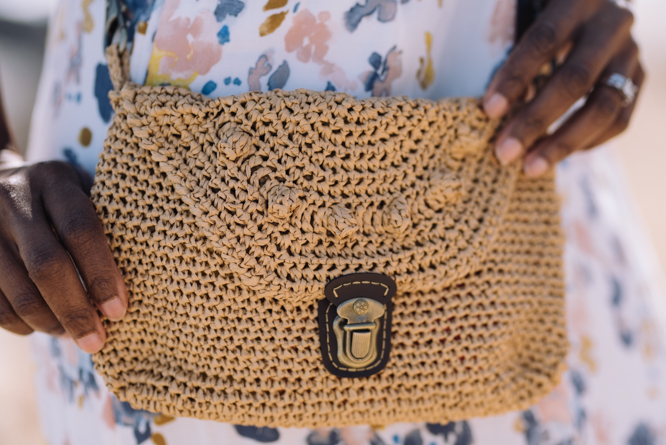
This easy raffia purse is the trend you don’t want to miss out on. Featuring popcorn stitches for added texture and a metal closure to keep your valuables secure, this purse gives off those beachy vibes we love.
Time: Weekend Project
Skill Level: Easy
Size: 10.6” long and 6.7” tall (27 cm x 18 cm)
Gauge: 4 sc = 1” [2.5cm] (Gauge is not that crucial for this project)
Materials
 Yarn: Wool and the Gang Ra-Ra Raffia (100% Raffia; 273 yards [250 meters]/100 grams): Desert Palm (1 ball)
Hook: US size 7 (4.5 mm)
Notions: Large eye needle, stitch markers, bag fastening e.g. Prym Tuck Lock (40 x 55 mm), bag handles
Special Stitches
Popcorn (PC): Work 5 dc in indicated st, take working lp off the hook, insert hook in first dc of the 5 dc just made, place working lp back on hook, yo and draw through both lps on hook.
Notes on using Raffia yarn:
- Leave in the ball band and work from the inside of the yarn ball, raffia is very slippery and if you take off the ball band you could end up with a lot of unraveled raffia very quickly!
- Crochet fairly loosely and turn your hook as you pull through your loops so you don’t split the strands of raffia
- Take breaks as working continuously on a raffia project can be tiring on the hands
Pattern Notes
The bottom of the bag is worked using continuous rounds, Use a stitch marker to mark the start of each new round. The bag flap is worked separately in rows then whip stitched together at the end.
Pattern
Bag bottom
Ch 31.
Rnd 1: Sc in 2nd ch from hook, sc in next 28 ch, 3 sc in last ch, then working along the other side of the foundation ch, sc in next 28 ch, 2 sc in last ch. (62 sts)
Rnd 2: 2 sc in first st, sc in next 28 sts, 2 sc in next 3 sts, sc in next 28 sts, 2 sc in last 2 sts. (68 sts)
Rnd 3: [Sc in next st, 2 sc in next st, sc in next 29 sts, 2 sc in next st] 2 times, sc in next st, 2 sc in last st. (74 sts)
Rnd 4: Sc in next 2 sts, 2 sc in next st, sc in next 30 sts, 2 sc in next st, sc in next 2 sts, 2 sc in next st, sc in next 2 sts, 2 sc in next st, sc in next 2 sts, 2 sc in next st, sc in next 30 sts, 2 sc in next st, sc in next 2 sts, 2 sc in last st. (80 sts)
Bag side
Rnds 5–29: Sc in each st around. For last st on last rnd, sl st in last st. Fasten off. Weave in ends.
Bag flap
The ch 1 at the beginning of each row does not count as a st.
Row 1: Working into a magic ring, 3 sc, turn. (3 sts)
Row 2: Ch 1, (2 sc in each st) across, turn. (6 sts)
Row 3: Ch 1, (sc in next st, 2 sc in next st) across, turn. (9 sts)
Row 4: Ch 1, (sc in next 2 sts, 2 sc in next st) across, turn. (12 sts)
Row 5: Ch 1, (sc in next 3 sts, 2 sc in next st) across, turn. (15 sts)
Row 6: Ch 1, (sc in next 4 sts, 2 sc in next st) across, turn. (18 sts)
Row 7: Ch 1, (sc in next 5 sts, 2 sc in next st) across, turn. (21 sts)
Row 8: Ch 1, (sc in next 6 sts, 2 sc in next st) across, turn. (24 sts)
Row 9: Ch 1, (sc in next 7 sts, 2 sc in next st) across, turn. (27 sts)
Row 10: Ch 1, (sc in next 8 sts, 2 sc in next st) across, turn. (30 sts)
Row 11: Ch 3 (counts as first st), dc in next 2 sts, PC in next st, dc in next 4 sts, PC in next st, 2 dc in next st, dc in next 2 sts, PC in next st, dc in next 4 sts, PC in next st, dc in next st, 2 dc in next st, dc in next st, PC in next st, dc in next 4 sts, PC in next st, dc in next 2 sts, 2 dc in last st, turn. (33 sts)
Row 12: Ch 1, (sc in next 10 sts, 2 sc in next st) across, turn. (36 sts)
Row 13: Ch 1, (sc in next 11 sts, 2 sc in next st) across, turn. (39 sts)
Row 14: Ch 1, (sc in next 12 sts, 2 sc in next st) across, turn. (42 sts)
Row 15: Ch 1, (sc in next 13 sts, 2 sc in next st) across, turn. (45 sts)
Row 16: Ch 1, (sc in next 14 sts, 2 sc in next st) across, turn. (48 sts)
Rotate your work to work along the row-ends.
Row 17: Work sc in each sc row- end and 2 sc in dc row-end of Row 11 across, turn. (36 sts)
Rows 18–20: Ch 1, sc in each st across, turn.
Row 21: Working back around the curve of the bag flap, and including the row ends of Rows 17-20, reverse single crochet around the edge, leaving the top of Row 20 un-worked.
Finish off leaving a long tail for attaching the bag flap to the bottom of the bag.
You may need to stretch the flap of your bag slightly to straighten so that you can line up on the bag side evenly.
Bag handle loops (optional)
Ch 10.
Row 1: Sc in 2nd ch from hook, sc in each rem ch across. Fasten off leaving a long yarn tail.
Finishing
Position your bag so that the bag flap sits evenly on one side of your bag. Use yarn tail to whipstitch into place.
Add your chosen bag straps accordingly using the bag handle loops if necessary. Add fastening to the front flap and body of the bag as per fastener instructions.
I was interested in the round raffia handbag, but I only see the shoulder bag pattern. Can I get the pattern for the round handbag?
Hi there! Here is the link to the Round Trip Raffia Bag: https://www.ilikecrochet.com/magazine/crochet-bag-patterns/round-trip-raffia-bag/ Enjoy! -Dana, Editor
On Row 3 is worked over 34 sts per side (68 stitches from row 2), but the instructions only use 32 of the 34 sts available: sc 1st st, 2sc 2nd st, 29 sc over next 31 sts, & 2sc on next st which is the 32nd st. The total numberb of stitches in only 34 for a total of 68, instead of the 74 listed on the instructions.Help!!
Love it..