


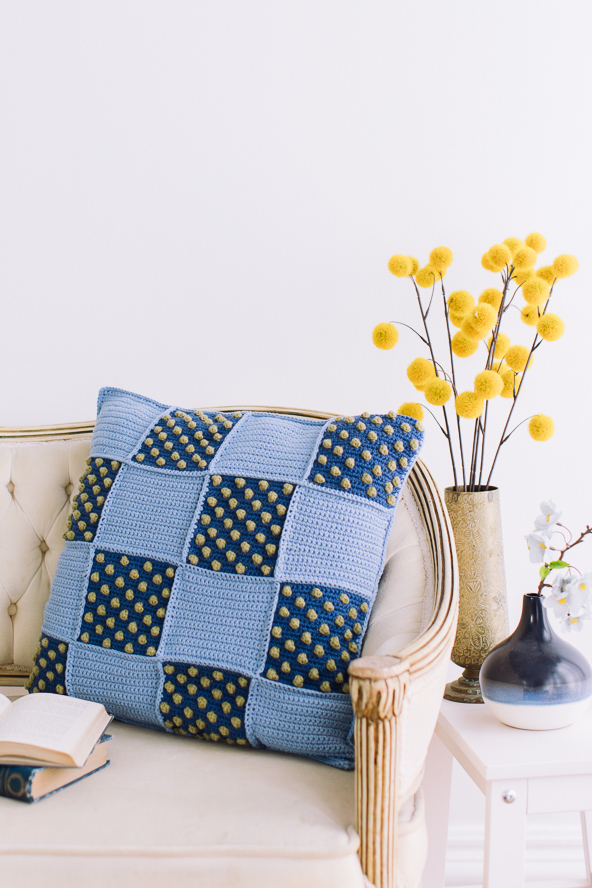
This throw pillow combines colorwork and textured stitches for a captivating result. With a whimsical polka dot pattern created through tapestry colorwork, it adds a pop of color and playful charm. The polka dot squares are joined with plain squares to form a checkered pattern, making it fun and vibrant.
The front side of the pillowcase consists of 16 squares joined with a simple single crochet stitch, creating a cohesive panel. The back is made of two panels using the linen/moss stitch, with an opening to insert the pillow. This pillow is the perfect addition to your chair, sofa, or bed, adding both color and intriguing texture to your space.
Time: Weekend Project
Skill Level: Easy
Size: Finished pillow cover size – Approx. 20 x 20” [50cm x 50cm]
Gauge: 19 sts and 19 rows = 4” [10 cm] in sc before blocking
Materials
 Yarn: Scheepjes Cahlista (100% double gassed cotton; 92 yards [85 meters]/50 grams): Color 527 Midnight (MC, 5 balls), Color 247 Bluebird (CC, 5 balls), Color 395 Willow (CC1, 3 balls)
Hook/Needles: US size H/8 (5.0 mm) and size 7 (4.5mm) crochet hooks.
Notions: Removable stitch markers, tapestry needle, five 1” buttons
Abbreviations
Mpc – mini popcorn stitch
Special Stitches
Mini Popcorn Stitch – make 3 dc in same st, remove your hook from the loop and insert it into the first dc of the 3-dc group, grab the loop and pull it through the first dc. Ch 1 to close the popcorn.
Pattern Notes
The front of the pillow is made of joining squares that are first worked in rows and then joined together to form the front panel.
Front is made of 16 squares total, 8 of these squares are made using the tapestry color changing technique.
The back is made of two separate rectangles then joined to the border of the front panel, leaving an opening between the two rectangles for the insert.
Pattern
Square 1 (make 8)
With MC and 5.0mm hook ch 24.
Row 1: Starting in 2nd ch from hook sc in each ch, ch 1, turn. (23 sc)
Row 2: (Use the tapestry technique in this row to work over the non-working color. All scs are made with MC and all mpcs are made with CC2, Refer to figure 1)
With MC, sc in first 2 sts, change color to CC2, [mpc in next st, Change the color to MC, sc in next 5 sts] three times, with CC2 mpc in next st, with MC sc in last 2 sts, ch 1, turn. (19 sc and 4 mpc)
Row 3: Working over CC2 with MC sc in each st across. (23 sc)
Row 4: With MC sc in first 5 sts, [with CC2 mpc in next st, with MC sc in next 5 sts] twice, with CC2 mpc in next st, with MC sc in last 5 sts. (20 sc and 3 mpc)
Row 5: Repeat row 3.
Row 6-17: Repeat rows 2-5.
Row 18-19: Repeat rows 2-3.
Fasten off, weave in the ends.
Square 2 (make 8)
With CC1 and 5.0mm hook ch 24.
Row 1: Starting in 2nd ch from hook sc in each ch, ch 1, turn. (23 sc)
Row 2 – 19: Sc in each st, ch 1, turn.
Fasten off, weave in the ends.
Back panel 1
With CC1 and 5.0mm hook ch 94.
Row 1: Sc in second ch from hook, sc in each ch until the end, ch 1, turn. (93 sc)
Row 2: (Sc, ch 1, skip next st) 46 times, sc in last st, ch 1, turn. (47 sc, 46 ch-sps)
Row 3: Sc in first st, (sc in ch-sp, ch 1, skip next st) 45 times, sc in last ch-sp and st, ch 1, turn. (48 sc, 45 ch-sps)
Repeat rows 2-3 to all 46 rows.
Fasten off, weave in ends.
Back panel 2
With MC and 5.0mm hook ch 94.
Repeat as for Back Panel 1 until 43 rows are made.
Row 44: Using the smaller hook (4.5mm) tightly sc in each sc and ch-sps of row 43, ch 1, turn. (93 sc)
Row 45: Sc in each st across.
Row 46: Sc in next 16 sts, [ch 8, sc in next 15 sts] 4 times, ch 8, sc in last 17 sts. (93 sc, 4 ch-8 loops)
Fasten off, weave in ends.
Finishing
Blocking: If square 1 and square 2 are different in height, wet block them to the same measurements.
Joining Squares: Lay the squares flat in order as in figure 2. Join squares to make horizontal stripes, then join those to complete the front panel. With wrong side facing and using MC, work sc sts through both loops/each row of each square. If you prefer you can sew the squares together, but I find it much easier to crochet them and the ridge between each square adds a nice feature to the final look.
Joining back and front: Lay back panel 1 and back panel 2 on front panel as shown (figure 3), wrong sides facing each other. Use the same sc joining method to join the borders of the panels together with MC.
Sew in the buttons accordingly.
Cute pillow!! At first glance I thought this was alternating denim squares and crochet squares, which got me wondering if it’s possible – or rather, how – to mix the two…
Is it possible to purchase all thread needed to make this cushion. I think it is delightful amd would love to make it. I live in an area with no shop to purchase these yarns. I have recently given up my car licensee which make it difficult
Hi Margaret, you will need to search Scheepjes Cahlista to find a website that has the yarn in stock to ship to you. – Nicola, Editor
This is really cute! I can see this a s christmas present!