

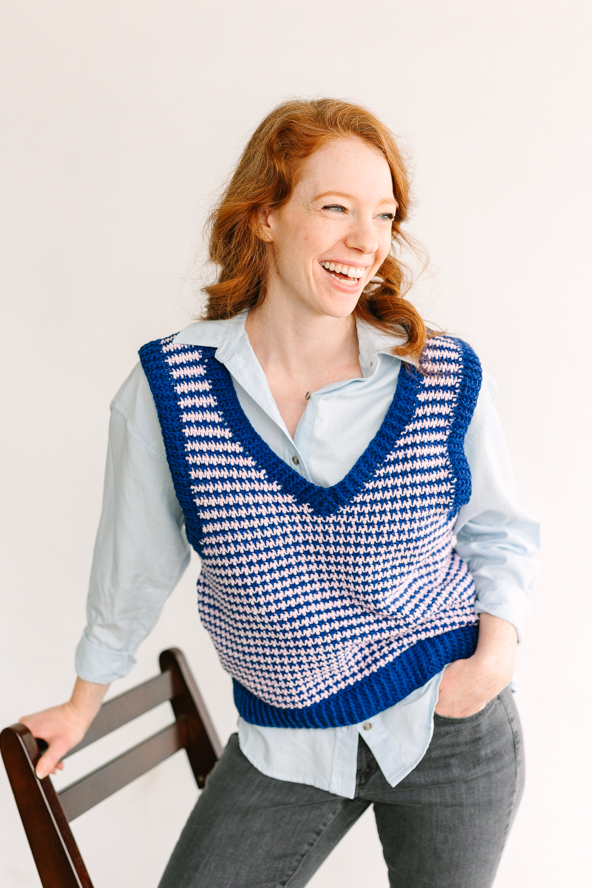
The Nora Sweater Vest is a versatile pattern suitable for all skill levels. With clear instructions and straightforward stitches, it’s accessible for beginners and enjoyable for experienced crocheters. Featuring the iconic houndstooth stitch, this classic design adds elegance and sophistication to any outfit, effortlessly complementing your personal style with a retro charm. The captivating texture of the houndstooth stitch enhances the overall aesthetic of the garment, making it a timeless and eye-catching piece.
Time: 15–25-hour project.
Skill Level: Easy
Size: Finished Bust Size 33 (37, 41, 45, 49)” to fit bust size 32 (36, 40, 44, 48)”.
1-2“positive ease recommended for width.
Gauge: 18 sts and 14 rows = 4″ [10cm] in houndstooth stitch pattern after blocking.
Materials
 Yarn: Sheepjes Catona (100% Mercerized Cotton; 137 yards [125 meters]/50 grams colors: 527 Midnight (MC, 5 (5, 6, 7, 7) balls), 238 Powder Pink (CC, 3 (3, 4, 4, 5) balls).
Hook: US size G-6 (4.0 mm), US size E-4 (3.5 mm).
Notions: Tapestry needle.
Special Stitches
Houndstooth stitch
The Houndstooth Stitch is made up of a 2-st sequence: [sc, dc] across. After each round/row you turn your work and repeat the sequence, making sure that each dc is worked into a sc st from the previous round and vice versa.
Pattern Notes
The body starts bottom-up in the round until the armhole, where front and back are separated, shaping armholes and neckline. Shoulders are joined by a sl st. Finally, neckline and armhole ribbings are made by picking up stitches along the edges.
When making the pattern, you need to turn at the end of each round/row, regardless of whether you are working flat or in the round. That means that you work the MC always on the RS, and the CC on the WS.
This pattern switches colors on every row/round; thus, when the pattern is worked flat, the color that is not being worked is carried along the row and worked over by the active color.
Ribbings are worked always on the RS (without turning).
Left and right sides refer to how the garment is worn on the body.
Chains at the beginning of rounds/rows do not count as sts.
I recommend working set-up rnds loosely or with a larger hook size than the rest of the pattern to avoid stretching the edges.
As opposed to knitting, crochet stretches mainly lengthwise; thus, I suggest measuring the length of your pieces while working to assure your desired final measurement. If you need to adjust the number of rows, this can be easily done in the upper part of the piece.
Pattern
Hem Ribbing
Set-up Rnd: With MC and larger hook, ch 152 (172, 188, 208, 228), sl st in first ch to form a ring. Place BOR m (it will mark the right mid-underarm)
Change to smaller hook.
Rnd 1 (RS): Ch 3, dc to end, sl st in first st to join, do not turn. (152 (172, 188, 208, 228) sts)
Rnds 2-8: Ch 3, *FPdc, BPdc; rep from * to end, sl st in first st to join, do not turn.
Body
Rnd 1 (RS): With MC, ch 2, *sc, dc; rep from * to end, sl st in first st, turn.
Rnd 2 (WS): With CC, ch 2, *sc, dc; rep from * to end, sl st in first st, turn.
Rep last 2 rounds 16 (17, 18, 19, 20) more times.
Fasten off at end of last row.
Separate for front and back
Note: Remember the color not being worked is carried along the row.
Back
With RS facing, sk next 12 (12, 16, 16, 18) sts from BOR.
Part 1: Shape armholes
Row 1 (RS): With MC, ch 2, *sc, dc; rep from * 25 (30, 30, 35, 38) times, turn. (52 (62, 62, 72, 78) sts)
Row 2 (WS): With CC, sl st 1, *sc, dc; rep from * to last st, leave last st unworked, turn. (50 (60, 60, 70, 76) sts)
Row 3: With MC, sl st 1, *sc, dc; rep from * to last st, leave last st unworked, turn. (48 (58, 58, 68, 74) sts)
Row 4: With CC, sl st 1, *sc, dc; rep from * to last st, leave last st unworked, turn. (46 (56, 56, 66, 72) sts)
Rows 5-6: Rep last 2 rounds 1 more time. (42 (52, 52, 62, 68) sts)
Row 7: With MC, ch 2, *sc, dc; rep from * to end, turn.
Row 8: With CC, ch 2, *sc, dc; rep from * to end, turn.
Rep last 2 rounds 5 (6, 6, 7, 7) more times.
Part 2a: Shape right neck
Row 1 (RS): With MC, ch 2, *sc, dc; rep from * 5 (6, 6, 7, 7) more times, turn. (12 (14, 14, 16, 16) sts)
Row 2 (WS): With CC, sl st 1, *sc, dc; rep from * to end, turn. (11 (13, 13, 15, 15) sts)
Row 3: With MC, ch 2, *sc, dc; rep from * to last st, leave last st unworked, turn. (10 (12, 12, 14, 14) sts)
Row 4: With CC, sl st 1, *sc, dc; rep from * to end, turn. (9 (11, 11, 13, 13) sts)
Row 5: With MC, ch 2, *sc, dc; rep from * to end, turn.
Row 6: With CC, ch 2, *sc, dc; rep from * to end, turn.
Row 7: With MC, ch 2, *sc, dc; rep from * to end, turn.
Rep last 2 rounds 2 (3, 3, 4, 5) more times (ending with a MC row). Fasten off leaving long tail to join shoulders.
Part 2b: Shape left neck
With RS facing, sk next 16 (22, 22, 28, 34) sts for back neck.
Row 1 (RS): With MC, ch 2, *sc, dc; rep from * 5 (6, 6, 7, 7) more times, turn. (12 (14, 14, 16, 16) sts)
Row 2 (WS): With CC, ch 2, *sc, dc; rep from * to last st, leave last st unworked, turn. (11 (13, 13, 15, 15) sts)
Row 3: With MC, sl st 1, *sc, dc; rep from * to end, turn. (10 (12, 12, 14, 14) sts)
Row 4: With CC, ch 1, *sc, dc; rep from * to last st, leave last st unworked, turn. (9 (11, 11, 13, 13) sts)
Row 5: With MC, ch 2, *sc, dc; rep from * to end, turn.
Row 6: With CC, ch 2, *sc, dc; rep from * to end, turn.
Row 7: With MC, ch 2, *sc, dc; rep from * to end, turn.
Rep last 2 rounds 2 (3, 3, 4, 5) more times (ending with a MC row). Fasten off leaving long tail to join shoulders.
Front
With RS facing, sk next 12 (12, 16, 16, 18) sts from BOR.
Part 1: Shape armholes
Row 1 (RS): With MC, ch 2, *sc, dc; rep from * 25 (30, 30, 35, 38) times, turn. (52 (62, 62, 72, 78) sts)
Row 2 (WS): With CC, sl st 1, *sc, dc; rep from * to last st, leave last st unworked, turn. (50 (60, 60, 70, 76) sts)
Row 3: With MC, sl st 1, *sc, dc; rep from * to last st, leave last st unworked, turn. (48 (58, 58, 68, 74) sts)
Row 4: With CC, sl st 1, *sc, dc; rep from * to last st, leave last st unworked, turn. (46 (56, 56, 66, 72) sts)
Rows 5-6: Rep last 2 rounds 1 more time. (42 (52, 52, 62, 68) sts)
Part 2a: Shape left neck
Row 1 (RS): With MC, ch 2, *sc, dc; rep from * 9 (12, 12, 14, 16) more times, turn. (20 (26, 26, 30, 34) sts)
Row 2 (WS): With CC, sl st 1, *sc, dc; rep from * to end, turn. (19 (25, 25, 29, 33) sts)
Row 3: With MC, ch 2, *sc, dc; rep from * to last st, leave last st unworked, turn. (18 (24, 24, 28, 32) sts)
Row 4: With CC, sl st 1, *sc, dc; rep from * to end, turn. (17 (23, 23, 27, 31) sts)
Rep last 2 rounds 4 (6, 6, 8, 9) more times. (9 (11, 11, 11, 13) sts)
Part 3a: Upper left neck
Row 1 (RS): With MC, ch 2, *sc, dc; rep from * to end, turn.
Row 2 (WS): With CC, ch 2, *sc, dc; rep from * to end, turn.
Rep last 2 rounds 4 (4, 5, 4, 4) more times (ending with a CC row). Fasten off leaving long tail to join shoulders.
Part 2b: Shape right neck
Row 1 (RS): With MC, and rejoining at the beginning of Row 6 from past 1 (armhole shaping) ch 2, *sc, dc; rep from * 9 (12, 12, 14, 16) more times, turn. (20 (26, 26, 30, 34) sts)
Row 2 (WS): With CC, ch 2, *sc, dc; rep from * to last st, turn. (19 (25, 25, 29, 33) sts)
Row 3: With MC, sl st 1, *sc, dc; rep from * to end, turn. (18 (24, 24, 28, 32) sts)
Row 4: With CC, ch 2, *sc, dc; rep from * to last st, turn. (17 (23, 23, 27, 31) sts)
Rep last 2 rounds 4 (6, 6, 8, 9) more times. (9 (11, 11, 11, 13) sts)
Part 3b: Upper right neck
Row 1 (RS): With MC, ch 2, *sc, dc; rep from * to end, turn.
Row 2 (WS): With CC, ch 2, *sc, dc; rep from * to end, turn.
Rep last 2 rounds 4 (4, 5, 4, 4) more times (ending with a CC row). Fasten off leaving long tail to join shoulders.
With RS facing (working in the WS of the piece) and with MC, join shoulders with a sl st across.
Neckline ribbing
Set-up round (RS): Starting in the left shoulder, ch 2, 52 (64, 69, 75, 85) sts across the left neckline, 16 (22, 22, 29, 34) across the back neck, and 52 (64, 69, 75, 85) across the right neckline, place marker (PM) in the middle of the front neckline, sl st in first st to join, do not turn.
Rnd 1 (RS): Ch 3, BPdc, [FPdc, BPdc] to one st before M, RM, FPdc3tog, PM, [BPdc, FPdc] to end, sl st in first st to join, do not turn. (118, (148, 158, 177, 202) sts)
Rnd 2: Ch 3, [BPdc, FPdc] to one st before M, RM, BPdc3tog, PM, FPdc, [BPdc, FPdc] to end, sl st in first st to join, do not turn. (116, (146, 156, 175, 200) sts)
Rnd 3: Ch 3, BPdc, [FPdc, BPdc] to one st before M, RM, FPdc3tog, PM, [BPdc, FPdc] to end, sl st in first st to join, do not turn. (114 (144, 154, 173, 198) sts)
Armholes ribbing
Set-up round (RS): Starting in the mid shoulder, ch 2, 114 (126, 142, 148, 158) dc around armhole, place markers (PM) at both ends of the body armhole, sl st in first st to join, do not turn.
Rnd 1 (RS): Ch 3, BPdc, *[FPdc, BPdc] to last st before M, RM, FPdc3tog, PM, [BPdc, FPdc] to end, sl st in first st to join, do not turn. (112, (124, 140, 146, 156) sts)
Rnd 2: Ch 3, *[FPdc, BPdc] to last st before M, RM, FPdc3tog, PM; rep from * once, [BPdc, FPdc] to end, sl st in first st, do not turn. (110 (122, 138, 144, 154) sts)
Rnd 3: Ch 3, BPdc, *[FPdc, BPdc] to last st before M, RM, FPdc3tog, PM; rep from * once, [BPdc, FPdc] to end, sl st in first st, do not turn. (108 (120, 136, 142, 152) sts)
Finishing
Weave in all ends. Wash and block.
I’m working in the neckline ribbing, and I’m a little confused by some of the abbreviations. (M, RM, FPdc3tog, PM) this is the part I’m confused on. The previous row indicates the PM is place marker, but what is RM/M? The way they look in the copied line seems like PM/RM/M are stitches, but I just don’t know how to proceed.
Hi Nichole,
Here you have the meaning of the abbreviations.
M=Marker;
RM=Remove marker;
FPdc3tog: Front Post double crochet 3 together: you have to make 3 double crochet together (2decreases) passing the hook through the front post;
PM=Place Marker.
I hope it helps, and apologies for the confusion.
Kind Regards,
Cristina
Hi Bette,
BOR means “Beginning Of Round”. I thought it was under the standard abbreviations list of the magazine. i will check and if not I will ask to add it to the pattern.
I hope you liked the pattern!
Kind Regards,
Cristina
What does “BOR m” mean at the end of the Set Up Rnd? I can’t find an abbreviation list in the pattern. Set-up Rnd: With MC and larger hook, ch 152 (172, 188, 208, 228), sl st in first ch to form a ring. Place BOR m (it will mark the right mid-underarm)
I realize that it marks the right mid-underarm but otherwise I’m perplexed.
Bette