


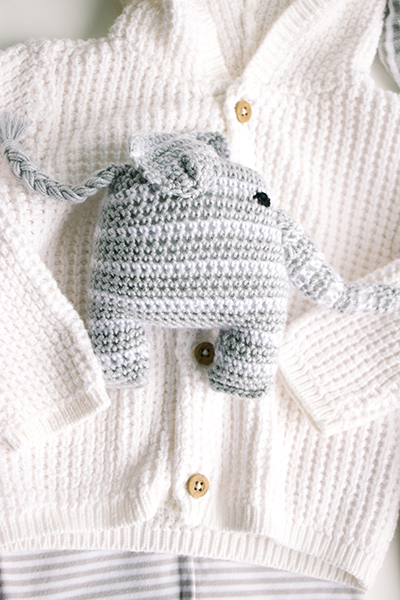
Elliot is just the right size for your little one to take on car rides or adventures in the playroom. Simple to make with adorable stripes, this amigurumi makes a great last-minute baby shower gift.
Time: Day Project
Skill Level: Easy
Size: Approx. 4.5” tall x 4” wide, excluding trunk and ears
Gauge: 20 sts and 22 rows = 4” [10 cm] in sc. Fabric should be fairly tight so stuffing does not escape
Materials
 Yarn: Universal Yarn Little Bird (100% Acrylic; 344 yards [315 meters]/100 grams): Color #112 Ghostie Gray (MC, 1 ball), Color #101 Snow Fort (CC, 1 ball)
Hook: US size F/5 (3.75 mm)
Notions: Back embroidery floss, embroidery needle, tapestry needle, small amount stuffing, removable marker
Pattern Notes
Stripe Pattern is *3 rows MC, 1 row CC; rep from * as needed.
Elephant is worked from the top down, then the trunk is crocheted separately.
Pattern
Body
With MC, ch 15.
Rnd 1: Sc in 2nd ch from hook and in each ch across to last ch, 3 sc in last ch, working on opposite side of foundation ch, sc in each ch across to first st of rnd, 2 more sc in same ch as first st. Join rnd with sl st in first sc. (32 sc)
Rnd 2: Ch 1, sc in same sc as rnd join, sc in each of next 12 sc, 3 sc in next sc, sc in each sc across to last sc, 3 sc in last sc. Join rnd with sl st in first sc. (36 sc)
Rnd 3: Ch 1, sc in each sc around. Join rnd with sl st in first sc.
Rnd 4: Change to CC, ch 1, sc in same sc as rnd join, sc in each of next 14 sc, 3 sc in next sc, sc in each sc around until 2 sts rem, 3 sc in next sc, sc in next sc. Join rnd with sl st in first sc. (40 sc)
Rnd 5: Change to MC, ch 1, sc in each sc around. Join rnd with sl st in first sc.
Rnds 6-7: Rep Rnd 3.
Rnd 8: Change to CC, ch 1, sc in same sc as rnd join, sc in each of next 16 sc, 3 sc in next sc, sc in each sc around until 3 sts remain, 3 sc in next sc, sc in each of next 2 sc. Join rnd with sl st in first sc. (44 sc)
Rnd 9: Rep Rnd 5.
Rnds 10-11: Rep Rnd 3.
Rnd 12: Change to CC, ch 1, sc in same sc as rnd join and in next sc, sc in each of next 18 sc, 3 sc in next sc, sc in each sc around until 4 sts rem, 3 sc in next sc, sc in each of next 3 sc. Join rnd with sl st in first sc. (48 sc)
Rnds 13-20: Work even in sc, maintaining stripe pattern as established.
Fasten off.
First Leg
Rnd 1: Count back 7 sts before end of rnd, join MC with sl st in that st, ch 1, sc in same st as sl st and in each of next 13 sc. Leave rem sts unworked. Join rnd with sl st in first sc.
Rnds 2-7: Work even in sc, maintaining stripe pattern as established.
Fasten off.
Second Leg
Rnd 1: Counting from where Rnd 1 of First Leg ended, sk 10 sc, join MC with sl st in next st, ch 1, sc in same st as sl st and in each of next 12 sc. Leave rem sts unworked. Join rnd with sl st in first sc.
Rep Rnds 2-7 of First Leg.
Fasten off.
Trunk
Note: Trunk is worked in a spiral, mark beg of each rnd.
With MC, ch 2.
Rnd 1: Work 6 sc in 2nd ch from hook. Orient sts in the rnd to continue stitching.
Rnds 2-7: Work even in sc, following stripe pattern.
Rnd 8: Sc in each of next 2 sc, 2 sc in each of next 2 sc, sc in each of next 2 sc. (8 sc)
Rnds 9-15: Work even in sc, maintaining stripe pattern as established.
Note: We are now changing to working in rows. Maintain stripe pattern.
Row 1: Sc2tog, sc in each of next 4 sc, sc2tog, ch 1, turn. (6 sc)
Row 2: Sc in each sc across, ch 1, turn.
Row 3: Sc2tog, sc in each of next 2 sc, sc2tog. (4 sc)
Fasten off, leaving a long tail for sewing.
Ears (Make 2)
With MC, ch 4.
Row 1: Sc in 2nd ch from hook and in each of next 2 ch, ch 1, turn. (3 sc)
Row 2: Work 3 sc in each of next 3 ch, ch 1, turn. (9 sc)
Row 3: Sc in each sc across, ch 1, turn.
Row 4: Sc in each sc across, change to CC, ch 1, turn.
Row 5: With CC, sc in each sc across, change to MC, ch 1, turn.
Rows 6-7: With MC, sc in each sc across, ch 1, turn.
Row 8: With MC, sc in each sc across, change to CC, ch 1, turn.
Row 9: With CC, 2 sc in first sc, sc in each sc across to last sc, 2 sc in last sc, change to MC, ch 1, turn. (11 sc)
Row 10: With MC, sc in each sc across.
Fasten off.
Finishing
Fold legs flat and sew or sc them closed.
Stuff Body and Legs, sew opening closed at the belly with whip stitch.
Stuff Trunk and sew it to one side of elephant body as shown in photo.
Sew ears on either side of head, about a third of the way back from the side with the trunk.
Using black embroidery floss, embroider eye on each side of elephant, slightly higher than the top of the trunk.
Weave in all ends.
Tail
Cut 9 strands of MC 20” long. Thread all 6 strands through the tapestry needle. Use the tapestry needle to thread the strands under 2 sc at the top outer edge of the tail side of the elephant body. Center the yarn strands by taking the needle out and gently tugging until the cut ends are level with each other, leaving a fold under those top 2 sc. You will now have 18 cut ends in your hand.
Divide the yarn into 3 bundles of 6 strands each and braid them.
To secure the tail, tie the cut ends into an overhand knot about 0.75” up from the shortest cut end. Trim all ends to same length.
Love it.