


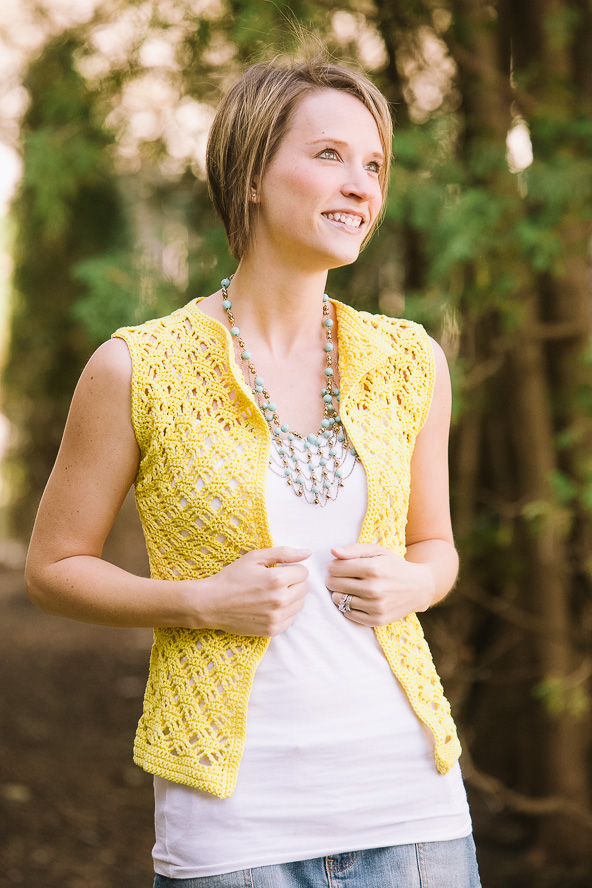
Mix some sunshine in with your crochet to make this stunning piece that’s bold and versatile. Watch it become a summer staple as you pair it with dresses, tank tops and tees.
Skill Level: Intermediate
Finished Size: XS (S, M, L, XL, 2XL) to fit chest size 34 (36, 38, 40, 44, 48)” / 86.5 (91.5, 101.5, 112, 122) cm
Gauge: 20 sc on G/4 mm hook = 4”/10cm after blocking
Pattern repeat of 8 sts and 6 rows 2”/4cm in width & 1.5”/4 cm in height after blocking
Materials
 Yarn: Tahki Yarns Cotton Classic (100% cotton; 108 yards [99 meters]/50 grams): #3533 Bright Yellow (7 [8, 10, 11, 13, 15] skeins)
Hook: US size G/6 (4.0 mm) hook
Notions: Hook stitch markers, tapestry needle
Pattern Notes
This vest is crocheted from the bottom up, in one piece for the fronts and back. At the armholes, the fronts and back are worked separately to the top.
Pattern
Ch 138 (146, 154, 170, 178, 194).
Row 1: Ch 1, sc into 2nd ch from hk, sc into each ch to end of row, turn. (137, 145, 153, 169, 177, 193 sc)
Row 2: Ch 1, sc into each sc to end of row, turn.
Rep Row 2-3 more times.
Start working lace pattern.
Lace Stitch Pattern
Set-up Row (RS): Ch 1, sc in sc in next 3 sc, * ch 5, sk 3 sc, sc in next 5 sc,
rep from * across to last 6 sc, ch 5, sk 3 sc, sc in last 3 sc, turn.
Row 1: Ch 1, sc in 1st 2 sc, * ch 3, sk next sc, sc in next ch-5 sp, ch 3, sk 1 sc, sc in next 3 sc, rep from * across to last ch-5 sp, ch 3, sc in last ch-5 sp, ch 3, sc in last 2 sc, turn.
Row 2: Ch 1, sc in sc, * ch 3, sk next sc, sc in next ch-3 sp, sc in sc, sc in next ch-3 sp, ch 3, sk 1 sc, sc in next sc, rep from * across, turn.
Row 3: Ch 5 (counts as dc, ch-2 sp), * sc in ch-3 sp, sc in next 3 sc, sc in next ch-3 sp, ch 5, sk sc, rep from * across to last 2 ch-3 sps, sc in ch-3 sp, sc in next 3 sc, sc in next ch-3 sp, ch 2, dc in last sc, turn.
Row 4: Ch1, sc in dc, * ch 3, sk next sc, sc in next 3 sc, sk next sc, ch 3, sc in ch-5 sp, rep from * across, turn.
Row 5: Ch 1, sc in 1st sc, sc in next ch-3 sp, * ch 3, sk 1 sc, sc in next sc, ch 3, sc in next ch-3 sp, sc in sc, sc in next ch-3 sp, rep from * across to last 2 ch-3 sps, ch 3, sk 1 sc, sc in next sc, ch 3, sk sc, sc in last ch-3 sp, sc in last sc, turn.
Row 6: Ch 1, sc in 1st 2 sc, sc in next ch-3 sp, * ch 5, sk sc, sc in next ch-3 sp, sc in next 3 sc, sc in next ch-3 sp, rep from * across to last 2 ch-3 sps, ch 5, sc in last ch-3 sp, sc in last 2 sc, turn.
Rep Rows 1-6 – 7 (9, 9, 9, 10, 10) more times.
Cont. working right front, left front and back separately from this point forward. Place 2 hook markers to mark armhole placement as follows:
holding piece with RS facing, for the Right Front count off 4 (4.5, 5, 5.5, 6, 7) – 8 st pattern repeats, place marker.
Note: For Sizes XS, M, XL & 2XL stitch marker is placed in the center of a ch-5 sp. For Sizes S & L, stitch marker is placed in the center sc of a 5 sc sequence.
For the Back, count off 9 (9, 9, 10, 10, 10) – 8 st repeats, place marker.
Note: For Sizes XS, M, XL & 2XL stitch marker is placed in the center of a ch-5 sp. For Sizes S & L, stitch marker is placed in the center sc of a 5 sc sequence.
This leaves 4 (4.5, 5, 5.5, 6, 7) – 8 st pattern repeats for the Left Front.
Right Front
Cont. working in pattern, end row where hook marker is placed.
Rep Lace Pattern Rows 1-6 – 5 (5, 6, 6, 6, 7) more times.
For sizes S & XL only rep Lace Pattern Rows 1-3 one more time.
Next Row: Ch 1, sc into each of the sc and ch sps of previous row, to end of row. Fasten off.
Back
Starting where first hook marker is placed, cont. working in pattern, but end row where second hook marker is placed.
Rep Lace Pattern Rows 1-6 – 5 (5, 6, 6, 6, 7) more times.
For sizes S & XL only rep Lace Rows 1-3 one more time.
Next Row: Ch 1, sc into each of the sc and ch sps of previous row, to end of row. Fasten off.
Left Front
Starting where second hook marker is placed, cont. working in pattern to end of row.
Rep Lace Pattern Rows 1-6 – 5 (5, 6, 6, 6, 7) more times.
For sizes S & XL only rep Lace Pattern Rows 1-3 one more time.
Next Row: Ch 1, sc into each of the sc and ch sps or previous row, to end of row. Fasten off.
Finishing
Weave in ends. Block piece to measurement.
Seam Shoulders
With RS facing, sew shoulder seam from the outside toward neck until seam measures 3.5 (4, 4.5, 5, 6, 6.5)” / 9 (10, 11.5, 12.5, 15, 16.5) cm.
Front and Neck Band
Set-up Row (RS): With the RS facing, starting at the bottom of the right front, sc along the edge of the right front, sc into each sc row, 2 sc into each 3-ch sp, to the right front upper corner, 3 sc into the corner, cont. sc into each sc of the top right front edge. Cont. sc into each sc of the top back edge, cont. sc into each sc of the top left front edge, to the left front upper corner, 3 sc into the corner, cont. sc along the front edge of the left front, sc into each sc row, 2 sc into each 3-ch sp, cont. to bottom of left front, turn.
Row 1: Ch1, sc into each sc to the right front upper corner, 3 sc into the corner sc, cont. sc into each sc across the neckline, to the left front upper corner, 3 sc into the corner sc, cont. sc into each sc to bottom of left front, turn.
Rep Row 1 two more times, fasten off.
Armhole (Work 2 Times)
Set-up Round: With the RS of fabric facing, starting at the bottom of the armhole opening, sc into each sc row, 2 sc into each 3-ch sp, around to beginning of round.
Next Round: Sl st into 1st sc, ch1, sc into each sc to end of round, sl st into 1 sc of beginning of round, fasten off.
Finishing
Steam block sc borders. Weave in ends.
Optional: Fold front corner over and stitch into place or decorate with a pretty button.
It would be nice to have multiple views of the patterns to buy. From, back and side as worn and also laying flat. This applies to all patterns.
Hi Bette! Some of our older patterns do not have as many photos, but for all of our newer patterns we aim to have many photos that view all angles of the pattern. – Nicola, Editor
Thanks for this beautiful suny pattern..it’d be nice if a “drawing” of pattern ‘d be added..visual aid..
I would like to see what weight this yarn is.Not all ways able to get the yarn used in this pattern
Hi there! We have updated the pattern to include the yarn weight, thanks for bringing this to our attention! All of our new patterns include the yarn weight, but some of our older patterns like this one need to be updated. I also recommend YarnSub for all your yarn substitution needs: https://yarnsub.com/yarns/tahki_yarns/cotton_classic
Happy crocheting! – Nicola, Editor