


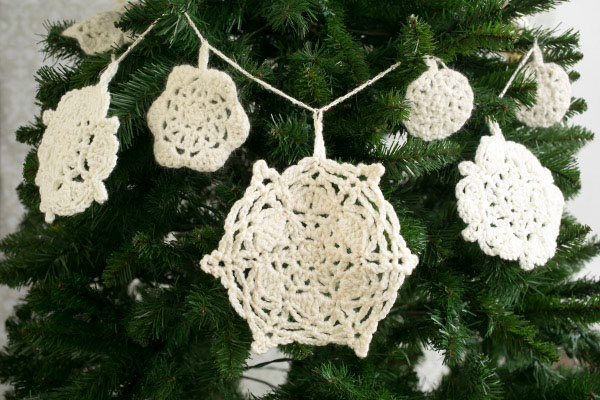
This garland is not only a pretty accent piece most anywhere in the house during the holiday season, but the added silver-lined seed beads provide just a little extra sparkly reflective light. Use the garland as tree trim, hung around a mantle or across a wall.
Skill Level: Easy
Size: 6’ long
Gauge: Largest motif = 7” in diameter with largest hk and worsted weight yarn. Gauge is not important in this project.
Materials
Yarn: LB Collection Angora Merino (80% extra fine merino wool, 20% angora; 131 yards [120 meters]/50 grams): #093 Vanilla (Y1, 1 skein); Lion Brand Yarn’s Martha Stewart Crafts Extra Soft Wool Blend (65% acrylic, 35% wool; 164 yards [150 meters]/100 grams): #599 Buttermilk (Y2, 1 skein); Lion Brand Yarn Superwash Merino Cashmere (72% superwash merino wool, 15% nylon, 13% cashmere; 87 yards [80 meters]/40 grams): #098 Ivory (Y3, 1 skein); Lion Brand Yarn Sock-Ease (75% wool, 25% nylon; 438 yards [400 meters]/100 grams): #100 marshmallow (Y4, 1 skein)
Hooks: US size I/9 (5.5 mm) hook, US size H/8 (5.0 mm) hook, US size 3.0 mm, US steel hook size 12 (1.0 mm)
Notions: 10 grams Japanese silver-lined clear size 6 seed beads, spray starch, iron with steam setting, flat heat resistant surface (such as a large cookie sheet or cardboard covered with aluminum foil)
Special Stitches
2dctog: (yo, insert hk in designated st or sp, yo and pull up lp, yo and draw through 2 lps on hk) twice, yo and draw through all remaining lps on hk
Pattern Notes
Individual motifs are worked and then attached to a beaded length of chain.
Snowflakes of varying sizes are worked all from one main snowflake motif.
After motifs are blocked, a topical application of spray starch and steam is applied to the larger motifs for additional body and integrity; however, motifs are not meant to be completely stiffened.
Pattern
Largest Snowflake (Make 2)
With Y2 and I hk, form a magic ring, ch 2 (counts as first hdc), 5 hdc into ring, sl st into top of initial ch 2 (6 hdc). Pull magic ring to form a closed ring.
Rnd 1: Ch 3 (counts as sc, ch 2), *sc in next st, ch 2, sc in next st. Repeat from * around, ending with sl st in first ch. (6 ch-2 sps)
Rnd 2: Sl st into next ch-2 sp, ch 5 (counts as dc, ch 2), [dc, ch 2, 2dctog] in same ch-2 sp, *(dc [ch 2, dc] twice) in next ch-2 sp, ([dc, ch 2] twice, 2dctog) in next ch-2 sp. Repeat from * around, ending with sl st in 3rd ch of initial ch-5. (12 ch-2 sps, 15 dc, 3 2dctog)
Rnd 3: Sc in same sl st ending Rnd 2, ch 3, sc in next dc, ch 3, sc in next 2dctog, *sc in next dc, (ch 3, sc in next dc) twice, (sc in next dc, ch 3) twice, sc in next 3dctog. Repeat from * around, ending with sl st in first sc. (12 ch-3 sps, 18 sc)
Rnd 4: *(Sc, hdc, dc, tr) in next ch-3 sp, (tr, dc, hdc, sc) in next ch-3 sp. Repeat from * around, ending with sl st in 1st sc. (12 tr, 12 dc, 12 hdc, 12 sc)
Rnd 5: *Ch 5, sc in sp between next two tr, ch 5, sl st in next sc, ch 7, sl st in next sc. Repeat from * around, ending with sl st in initial sl st. (6 ch-7 sps, 12 ch-5 sps)
Rnd 6: Sl st into next ch-5 sp, sc in same ch-5 sp, ch 3, sc in next ch-5 sp, ch3, (sc, ch 3, sc) in next ch-7 sp, *(ch 3, sc in next ch-5 sp) twice, ch 3, (sc, ch 3, sc) in next ch-7 sp. Repeat from * around, ending with ch 3, sl st in first sc. (24 ch-3 sps)
Rnd 7: Sl st into next ch-3 sp, *ch 6, sk next ch-3 sp, (sl st, ch 5, sl st) in next ch 3 sp, ch 6, sk next ch-3 sp, sl st in next ch-3 sp. Repeat from * around, ending with sl st in first sl st. (12 ch-6 sps, 6 ch-5 sps)
Rnd 8: Sl st into next ch-6 sp, *ch 3, (sl st, ch 2, sl st, ch 5, sl st, ch 2, sl st) into next ch-5 sp, ch 3, sl st into next ch-6 sp, ch 5, sl st into next ch-6 sp. Repeat from * 4 times, ending with ch 3, (sl st, ch 2, sl st, ch 5, sl st, ch 2, sl st) into next ch-5 sp, ch 3, sl st into next ch-6 sp, ch 12, sl st in 10th ch from hk (hanging loop made), ch 2, sl st into beg sl st. Fasten off. (12 ch-3 sps, 11 ch-5 sps, 1 ch-9 hanging lp sp)
Large Motif (Make 2)
With Y3 and H hk, work as for Largest Motif through Rnd 6.
Rnd 7: Sl st into next ch-3 sp, *ch 6, sk next ch-3 sp, (sl st, ch 5, sl st) in next ch 3 sp, ch 6, sk next ch-3 sp, sl st in next ch-3 sp. Repeat from * 4 more times, ending with ch 6, sk next ch-3 sp, (sl st, ch 5, sl st) in next ch 3 sp, ch 6, sk next ch-3 sp, sl st into beg sl st, ch 9, sl st in same beg sl st (hanging lp made). Fasten off. (12 ch-6 sps, 6 ch-5 sps, 1 ch-9 hanging lp sp)
Medium Motif (Make 3)
With Y2 and I hk, work as for Largest Motif through Rnd 4.
Rnd 5: *Ch 5, sc in sp between next two tr, ch 5, sl st in next sc, ch 7, sl st in next sc. Repeat from * 4 more times, ending with ch 5, sc in sp between next two tr, ch 5, sl st in next sc, ch 11, sl st in initial sl st (hanging lp made). (5 ch-7 sps, 12 ch-5 sps, 1 ch-11 hanging lp sp)
6 Point Motif (Make 3)
With Y1 and H hk, work as for largest Motif through Rnd 3.
Rnd 4: *(Sc, hdc, dc, tr) in next ch-3 sp, (tr, dc, hdc, sc) in next ch-3 sp. Repeat from * around, ending with ch 9, sl st in 1st sc (hanging lp made). (12 tr, 12 dc, 12 hdc, 12 sc, 1 ch-9 hanging lp)
Smallest Round Motif (Make 3)
With Y1 and H hk, work as for Largest Motif through Rnd 2.
Rnd 3: Sc in same sl st ending Rnd 2, ch 3, sc in next dc, ch 3, sc in next 2dctog, *sc in next dc, (ch 3, sc in next dc) twice, (sc in next dc, ch 3) twice, sc in next 3dctog. Repeat from * around, ending with sl st in first sc, ch 9, sl st in same initial sl st (hanging lp made). (12 ch-3 sps, 18 sc, 1 ch-9 hanging lp sp)
Finishing
Weave in ends. Pin and steam all motifs. For medium, large and largest motifs, once steamed and dry, place rs down on heat-resistant surface. Spray liberally with spray starch according to starch directions and, using highest steam iron setting, steam motifs. Let dry thoroughly. Repeat starching procedure on opposite side. If more integrity and body is desired, repeat starching procedure on each side once more, letting dry completely between repeats.
Attaching Motifs to Beaded Chain
With Y4 and 3.0 mm hk, ch 8, sl st in 7th ch from hk. *Continue creating ch length, placing a bead with steel hk at every 4th ch for 5” (approx 30 ch), add first motif with sl st in top of hanging lp according to schematic. Repeat from *, adding beads and motifs until all motifs are added. Work 5” more in beaded ch, ending with ch 8 and sl st in 7th ch from hk. Fasten off. Weave in remaining ends. 
Very good instructions, clear and detailed. Thank you!