


Staggered shell stitches on this Wistful Wisteria hat-and-mitten set impress with an even overall texture. The fold-back hem on the hat and the mitts hides a cleverly concealed bit of elastic for the perfect fit.
Skill Level: Easy
Size: Hat = 20 (22)” in circumference after a light blocking; Mitts = 8” in circumference after a light blocking
Gauge: 16 sts and 6 rows = 4” [10 cm] in pattern stitch after light blocking
Materials
 Yarn: Anzula For Better or Worsted (80% superwash merino, 10% cashmere, 10% nylon; 200 yards [182 meters]/100 grams): Fiona (2 balls)
Hook: US size 7 (4.5 mm) hook or size needed to obtain gauge
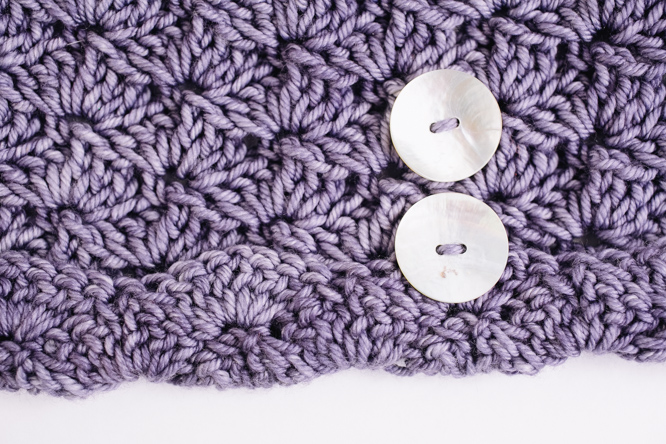
Notions: Tapestry needle, sewing needle and thread to secure elastic, 1 yd 3/8” wide flat elastic, mother-of-pearl buttons (2 – 1” buttons; 4 – 8” buttons).
Special Stitches
Shell: (3 dc, ch 1, 3 dc) in same st.
Pattern Notes
One skein of yarn will make the smaller hat, but you would need a small amount from the second skein for the larger one. There is plenty of yarn for either size hat and the gloves in two full skeins of yarn.
Ch-4 counts as 1 dc+ ch-1 sp
Pattern
Hat
Ch 80 (88). Join into a ring with sl st in first ch, being careful not to twist the chain.
Rnd 1: Ch 1, sc in same ch as join, sk 3 ch, shell in next ch, *+sk 3 ch, sc in next ch, sk 3 ch, shell in next ch. Rep from * around, sk 3 ch, join rnd with sl st in first sc. (10 (11) shells)
Rnd 2: Ch 4, 3 dc in same sc, sk 3 dc, sc in next ch-1 sp, *sk 3 dc, shell in next sc, sk 3 dc, sc in next ch-1 sp. Rep from * around, sk 3 dc, 2 dc in first sc, join rnd with sl st in 3rd ch of beg-ch-4.
Rnd 3: Sl s1 in first ch-1 sp, ch 1, sc in same ch-1 sp, sk 3 dc, shell in next sc, *sk 3 dc, sc in next ch-1 sp, sk 3 dc, shell in next sc. Rep from * around, sk 3 dc, join rnd with sl st in first sc.
Rows 4-10 (12): Rep Rnds 2-3 three (four) times then Row 2 once more.
Decrease Section
Rnd 1: Sl s1 in first ch-1 sp, ch 1, sc in same ch-1 sp, sk 3 dc, (2 dc, ch 1, 2 dc) in next sc, *sk 3 dc, sc in next ch-1 sp, sk 3 dc, (2 dc, ch 1, 2 dc) in next sc. Rep from * around, sk 3 dc, join rnd with sl st in first sc.
Rnd 2: Ch 4, 2 dc in same sc, sk 2 dc, sc in next ch-1 sp, *sk 2 dc, (2 dc, ch 1, 2 dc) in next sc, sk 2 dc, sc in next ch-1 sp. Rep from * around, sk 2 dc, dc in first sc, join rnd with sl st in 3rd ch of beg-ch-4.
Rnd 3: Sl s1 in first ch-1 sp, ch 1, sc in same ch-1 sp, sk 2 dc, (dc, ch 1, dc) in next sc, *sk 2 dc, sc in next ch-1 sp, sk 2 dc, (dc, ch 1, dc) in next sc. Rep from * around, sk 2 dc, join rnd with sl st in first sc.
Rnd 4: Ch 4, dc in same sc, sk 1 dc, sc in next ch-1 sp, *sk 1 dc, (dc, ch 1, dc) in next sc, sk 1 dc, sc in next ch-1 sp. Rep from * around, sk 1 dc, dc in first sc, join rnd with sl st in 3rd ch of beg-ch-4.
Rnd 5: Sl st in first ch-1 sp, ch 1, sc in same ch-1 sp, sk 1 dc, hdc in next sc, *sk 1 dc, sc in next ch-1 sp, sk 1 dc, sk 1 dc, hdc in next sc. Rep from * around, join rnd with st st in first sc. (20 sts)
Rnd 6: Ch 1, sc2tog all the way around, beginning with same sc as round join. End off leaving a 10-12“ tail. (10 sts)
Brim
Join yarn with dc in opposite side of foundation ch, directly opposite first sc in in Rnd 1 of Hat.
Rnd 1: Ch 1, sk 1 ch of foundation ch, dc in next ch, ch 1, dc in base of next shell, *ch 1, sk 1 ch, dc in next ch, ch 1, dc in base of next sc, ch 1, sk 1 ch, dc in next ch, ch 1, dc in base of next shell. Rep from * around, ch 1, sk 1 ch, dc in next ch, ch 1, join rnd in top of first dc. (40 dc)
Rnd 2: Ch 1, sc in same dc, sk 1 dc, shell in next dc, * sk 1 dc, sc in next dc, sk 1 dc, shell in next dc. Rep from * around, sk 1 dc, join rnd with sl st in first sc. (10 shells)
Rnds 3-4: Rep Rnd 2 of Hat, then Rnd 2 of Hat. End off after Rnd 4.
Fingerless Gloves (Make 2)
Loosely ch 32. Join into a ring with sl st in first ch, being careful not to twist the chain.
Rep Rows 1-6 of Hat. (4 shells)
Increase Section
Rnd 1: Sl st in first ch-1 sp, ch 4, 2 dc in same ch-1 sp, sk 3 dc, shell in next sc, * sk 3 dc, sc in next ch-1 sp, sk 3 dc, shell in next sc. Rep from * around, sk 3 dc, dc in first sc. (4 shells + 1 2-dc shell)
Rnd 2: Sl st in first ch-1 sp, ch 1, sc in same ch-1 sp, (2 dc, ch 1, 2 dc) between 2nd and 3rd dc from hook, (sk 3 dc, sc in next ch-1 sp, sk 3 dc, shell in next sc) 3 times, sk 3 dc, sc in next ch-1 sp, (2 dc, ch 1, 2 dc) between 3rd and 4th dc from hook, join rnd with sl st in first sc. (3 shells + 2 2-dc shells)
Rnd 3: Ch 4, 3 dc, in same sc, sk 2 dc, sc in next ch-1 sp, sk 2 dc, shell in next sc, (sk 3 dc, sc in next ch-1 sp, sk 3 dc, shell in next sc) 3 times, sk 2 dc, sc in next ch-1 sp, sk 2 dc, 2 dc in first sc, join rnd with sl st in 3rd ch of beg-ch-4. (6 shells)
Palm
Rnd 1: Sl st in first ch-1 sp and in each of next 7 sts and in next ch-1 sp, ch 1 , sc in same ch-1 sp, sk 3 dc, shell in net sc, (sk 3 dc, sc in next ch-1 sp, sk 3 dc, shell in next sc) 3 times, sk all remaining sts and sl sts at beg of rnd, join rnd with sl st in first sc. (4 shells)
Rnds 2-3: Rep Rnd 2-3 of Hat. End off after Rnd 3.
Hem
Rep instructions for Brim of Hat. There will be 16 dc in the mesh rnd, and 4 shells in the edging.
Finishing
Weave in ends.
Block lightly – do not overblock as the elasticity of the stitch pattern and the yarn make the accessories fit better.
Cut elastic for Brim/Hems the length that will comfortably around your head/wrists, plus .5” for overlap.
Weave each elastic in and out of the dc/mesh row of the Brim/Hems. Overlap .5” and the the ends together with the sewing needle and thread.
Fold up Brim/Hems at the base of the dc/mesh row. Tack into place all the way around, or simply use the decorative buttons to keep the hem in place on one side.
Stitch buttons into place as shown in photo – the large buttons on the hat, and the small buttons on the fingerless gloves.
I absolutely love this set, Hat, Scarf and Hand Warmers… This is Perfect!!
This is a pretty set , can’t wait to make it.
I love this set can’t wait to make it