


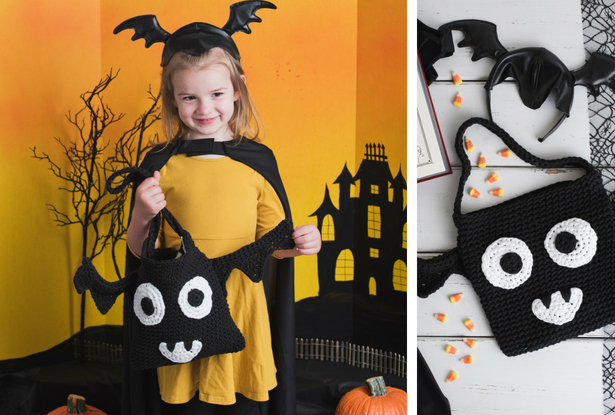
Get ready for trick-or-treating with this helpful little bat treat bag. This sturdy bag design can be used to hold your Halloween Treats as you go door-to-door. The wings are reinforced with gardening wire and are bendable so he can fly off into the night sky.
Skill Level: Easy
Size: Bag: 10” x 10” (on a flat surface), Strap: 20” long, with Wings attached: 24” across, Wings: 8.5”, Eyes: 3” diameter, Pupils: 1.5” diameter, Mouth: 3.5” wide x 2” tall
Gauge: 10 sts x 12 rnds = 4” [10 cm] in sc
Materials
Yarn: Bernat Maker Home Dec (72% Cotton, 28% Nylon; 317 yards [290 meters]/250 grams):
11012 Black (MC, 1 ball); Bernat Maker Fashion (72% Cotton, 28% Nylon; 126 yards [115 meters]/100 grams): White (CC, 1 ball)
Hook: US size J/10 (6.0 mm), US size L/11 (8.0 mm)
Notions: Removable stitch markers, tapestry needle, scissors, garden wire (or a bamboo barbeque skewer trimmed to size).
Abbreviations
PM – place marker
Pattern Notes
This bag is worked in continuous rounds from the bottom up with smaller hook. Use a stitch marker to mark your place. Do not slip stitch to join or chain additional stitches.
The strap, wings, eyes, and mouth are worked with the larger hook.
Pattern
Bag
With MC, ch 25.
Rnd 1: Sk first ch, sc in next 23 chs, 3 sc in last ch. Rotate piece to work across the bottom edge of foundation ch, sc in next 22 chs, 2 sc in last ch. (50 sc)
Rnds 2-29: Sc in each st around.
Fasten off with an invisible join. Weave in ends.
Strap
With MC, ch 50.
Rnd 1: Sk first ch, sc in next 48 chs, 3 sc in the last ch. Rotate piece to work across the bottom edge of foundation ch, sc in next 47 chs, 2 sc in the last ch. (100 sc)
Rnd 2: (Sl st, ch 1) in the first st, sl st in next 47 sts, (sl st, ch 1) in next 3 sts, sl st in next 47 sts, (sl st, ch 1) in next 2 sts. (6 ch-1 sp, 100 sl st)
Fasten off with an invisible join, leaving a long tail of yarn for assembly. Weave in ends.
Eyes (make 2)
Rnd 1: With CC, make 8 sc in a magic ring. (8 sc)
Rnd 2: Work 2 sc in each st around. (16 sc)
Rnd 3: Work *2 sc in next st, sc in next st; rep from * around. (24 sc)
Rnd 4: Work *2 sc in next st, sc in next 2 sts; rep from * around. (32 sc)
Fasten off with an invisible join, leaving a long tail for assembly.
Pupils (make 2)
Rnd 1: With CC, make 8 sc in a magic ring. (8 sc)
Fasten off with an invisible join, leaving a long tail for assembly.
Mouth
With CC, ch 8.
Row 1 (RS): Sk first ch, sc in next st, hdc in next 2 sts, 2 dc in next st, hdc in next 2 sts, sc in last st, ch 1, turn. (2 sc, 4 hdc, 2 dc)
Row 2: Sc in first st, hdc in next 2 sts, (hdc, dc) in next st, (dc, hdc) in next st, hdc in next 2 sts, sc in last st, ch 1. Do not turn. (2 sc, 6 hdc, 2 dc)
Rnd 3: Rotate piece to continue working along the bottom of starting ch row, sc in each ch across, ch 1, rotate piece to continue across the top of Row 2, sc in next 4 sts, 2 sc in next 2 sts, sc in next 4 sts. (19 sc)
Fasten off with an invisible join, leaving a long tail for assembly.
Right Wing (facing the bag)
Part 1
With MC, ch 22, leaving a long tail of for assembly.
Row 1 (RS): Sk first ch, sc in each ch across, ch 1, turn. (21 sc)
Rows 2-4: Sc in each st across, ch 1, turn. (21 sc)
Row 5: Sc in next 6 sts, sk next st, PM in next st, leave all rem sts unworked, ch 1, turn. (6 sc)
Row 6: Sc2tog, sc in next 4 sts, ch 1, turn. (5 sc)
Row 7: Sc in next 3 sts, sc2tog, ch 1, turn. (4 sc)
Row 8: Sc2tog, sc in next 2 sts, ch 1, turn. (3 sc)
Row 9: Sc in the first st, sc2tog, ch 1, turn. (2 sc)
Row 10: Sc2tog.
Fasten off. Weave in end.
Part 2
Note: With RS facing, you will be joining your yarn in the stitch where you placed the stitch marker.
Row 1: Join yarn in marked st with a standing sc, sc in next 7 sts, PM in next st, leave all rem sts unworked, ch 1, turn. (8 sc)
Row 2: Sc2tog, sc in next 4 sts, sc2tog, ch 1, turn. (6 sc)
Row 3: Sc in next 4 sts, sc2tog, ch 1, turn. (5 sc)
Row 4: Sc2tog, sc in next 3 sts, ch 1, turn. (4 sc)
Row 5: Sc in next 2 sts, sc2tog, ch 1, turn. (3 sc)
Row 6: Sc2tog, sc in next st, ch 1, turn. (2 sc)
Row 7: Sc2tog, ch 1, turn. (1 sc)
Row 8: Sc in the st. (1 sc)
Fasten off. Weave in your end.
Part 3
Note: With RS facing, you will be joining your yarn in the stitch where you placed the stitch marker.
Row 1: Join yarn in the marked stitch with a standing sc, sc in next 3 sts, sc2tog, ch 1, turn. (5 sc)
Row 2: Sc2tog, sc in next 3 sts, ch 1, turn. (4 sc)
Row 3: Sc in next 2 sts, sc2tog, ch 1, turn. (3 sc)
Row 4: Sc2tog, sc in next st, ch 1, turn. (2 sc)
Row 5: Sc2tog.
Fasten off. Weave in your end. (1 sc)
Left Wing
Part 1
With MC, ch 22, leaving a long tail of for assembly.
Row 1 (RS): Sk first ch, sc in each ch across, ch 1, turn. (21 sc)
Rows 2-4: Sc in each st across, ch 1, turn. (21 sc)
Row 5: Sc2tog, sc in next 4 sts, PM in next st, leave all rem sts unworked, ch 1, turn. (5 sc)
Row 6: Sc in next 3 sts, sc2tog, ch 1, turn. (4 sc)
Row 7: Sc2tog, sc in next 2 sts, ch 1, turn. (3 sc)
Row 8: Sc in next st, sc2tog, ch 1, turn. (2 sc)
Fasten off. Weave in end.
Part 2
Note: With RS facing, you will be joining your yarn in the stitch where you placed the stitch marker.
Row 1: Join yarn in the marked stitch with a standing sc, sc in next 7 sts, PM in next st, leave all rem sts unworked, ch 1, turn. (8 sc)
Row 2: Sc2tog, sc in next 4 sts, sc2tog, ch 1, turn. (6 sc)
Row 3: Sc2tog, sc in next 4 sts, ch 1, turn. (5 sc)
Row 4: Sc in next 3 sts, sc2tog, ch 1, turn. (4 sc)
Row 5: Sc2tog, sc in next 2 sts, ch 1, turn. (3 sc)
Row 6: Sc in next st, sc2tog, ch 1, turn. (2 sc)
Row 7: Sc2tog, ch 1, turn. (1 sc)
Row 8: Sc in the st. (1 sc)
Fasten off. Weave in your end.
Part 3
Note: With RS facing, you will be joining your yarn in the stitch where you placed the stitch marker.
Row 1: Join yarn in the marked stitch with a standing sc, sc in next 5 sts, ch 1, turn. (5 sc)
Row 2: Sc in next 4 sts, sc2tog, ch 1, turn. (5 sc)
Row 3: Sc2tog, sc in next 3 sts, ch 1, turn. (4 sc)
Row 4: Sc in next 2 sts, sc2tog, ch 1, turn. (3 sc)
Row 5: Sc2tog, sc in next st. (2 sc)
Row 6: Sc2tog. (1 sc)
Fasten off. Weave in your end.
Finishing
Use photo and diagram as a guide.
Sew Pupils to Eyes. Fasten off. Weave in ends.
Sew Eyes to Bag. For the sample, I placed the eyes 6 rnds down from the top of the bag. I placed them in 3 sts from the outer edges of the bag and left 3 sts between the 2 eyes in the center. There are 14 rnds beneath the eyes to the bottom of the bag.
Sew Mouth on Bag.
Add Teeth using MC as in photo.
Wings
Fold over the first 2 rows to create a tunnel. Seam the tunnel. Insert the twisted wire inside (it is cut to the same length as the wing itself). Seam the ends closed. For the sample, I create a loop on the ends of mine so I could secure it on both ends when I seamed.
Attach to wings in line with the top of the eyes, placing most of the first triangle shape on the back of the bag.
Seam securely to the bag around the entire shape of the triangle that is overlapped.
Repeat for the second wing. (see diagram).
Strap
With the bag flat, find the center stitch on each side. This is where you will be centering the strap.
Attach approximately 1” inside the bag from the strap on each side. Attach securely.
Fasten off. Weave in any ends.