


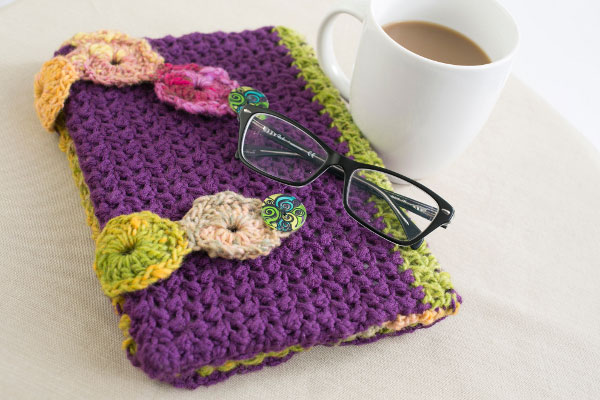
Take one easy-to-make rectangle, some motifs and a few buttons, and you’ve got yourself one stylish tablet cozy. Make the size that best fits your tablet’s dimensions, and it will be ready to go wherever you go.
Skill Level: Intermediate
Size: Small (med, large): 8 x 5 ½” (9 ½ x 7”, 11 ½ x 8”) finished measurements when closed. Sample shown is size medium.
Gauge: 17 sts/12 rows = 4” in pattern with MC
Materials
Yarn: Berroco Comfort (50% superfine nylon, 50% superfine acrylic; 210 yards [192 meters]/100 grams): #9722 Purple (MC, 1 skein); Noro Kureyon (100% wool; 110 yards [137 meters]/50 grams): #95 (CC, 1 skein)
Hook: US size H/8 (5.0 mm) hook or size needed to obtain gauge
Notions: Tapestry needle, 1 11 x 14” foam board, X-acto knife, Two (2) 1” diameter buttons, sewing thread, sewing needle, straight pins
Abbreviations
2hdctog: Two half double crochet together
2hdctogflo: Two half double crochet together in front loop only
3hdctog: Three half double crochet together
Special Stitches
2hdctog: (Yo, insert hk in next st or sp, yo and pull up lp) twice, yo and draw through all lps on hk.
3hdctog: (Yo, insert hk in next designated st or sp, yo and pull up lp) three times, yo and draw through all lps on hk.
Pattern Notes
The main body of cover is created in both MC and CC; 6 motifs are created in CC.
The main body rectangle is folded and a foam board is inserted.
An inside lip is worked along two sides of portion of remaining rectangle; motifs are attached and buttons added.
Pattern
Main Body of Cover
With MC, ch 37 (43, 51).
Row 1: Yo, insert hk in third ch from hk, yo and pull up lp, yo, insert hk in next ch, yo and pull up lp, yo and draw through all lps on hk (first 2hdctog worked), *ch 1, 2hdctog over next two ch. Rep from * across, ending with ch 1, hdc in final ch. Turn. (35 [41, 49] sts)
Row 2: Ch 2 (does not counts as first hdc), 2hdctog over next two sts, *ch 1, 2hdctog over next two sts. Rep from *, ending with ch 1, hdc in final st.
Row 2 forms main body pattern.
Repeat row 2 until piece measures 6 (7 ½, 8 ½)” from beg. Switch to CC and work for 1”. Fasten off CC.
Attach MC and work until piece measures 14 (18 ½, 21 ½)” from beg. Fasten off MC.
Attach CC and work until piece measures 17 (21 ½, 24 ½)” from beginning. Fasten off.
Motifs (Make 4)
With CC, ch 5, sl st in first ch to form ring.
Rnd 1: Ch 3 (counts as first dc), 17 dc in ring, sl st in top of initial ch 3. (18 dc)
Rnd 2: *Ch 2, sk next st, sl st in next st. Rep from *, ending with sl st in base of initial ch 2. (9 ch-2 sps)
Fasten off, leaving a 10” tail.
Buttonhole Motifs (Make 2)
Work as for motifs through end of Rnd 1.
Rnd 2: *Ch 2, sk next st, sl st in next. Rep from * 3 more times, then ch 5, sk next st, sl st in next st (buttonhole made). Rep from * across rem rnd, ending with sl st in base of initial ch 2. Fasten off, leaving a 10” tail. (8 ch-2 sps, 1 ch-5 sp)
Finishing Instructions – Creating Foam Board Pocket
Following Schematic A, fold over end 1/3 of main cover body. With tapestry needle and MC, seam top and bottom edge, creating foam board pocket (ws). Turn pocket rs out (3” of CC should be facing, 1” CC stripe should be on opposite side). With X-acto knife, cut foam board as follows: small – 8” x 5”, medium – 9 ½” x 6 ½”, large – 11 ½” x 7 ½”. Slip foam board into pocket. Thread tapestry needle with CC and seam inside edge of foam board pocket closed.
Creating Tablet Lip
Row 1: Following Schematic B and holding tablet cover open with foam board pocket below, attach CC with sl st 2 sts to left of top right corner. Ch 2, 2hdctogflo over next two edge sts, *ch 1, 2 hdctogflo over next two edge sts. Rep from * until 2 sts before left corner, working 3 hdctog in corner over last two sts and first st along inside side of cover, turning work 90 degrees clockwise. *Ch 1, 2hdctog along side, picking up sts just inside row edges. Rep from * for 7”, ending with ch 1, hdc. Turn.
Row 2: Sl st into st just above hdc; sl st into st just above that (2 sl sts attaching lip to inside top of tablet cover). 2 hdctog over next two sts, *ch1, 2hdctog over next 2 sts. Rep from * across row until two sts before corner, working 3 hdctog in corner as for row 1, except turning work 90 degrees counterclockwise. *Ch 1, 2hdctog over next 2 sts. Rep from * across row, ending with hdc in top of initial ch 2. Ch 4, sl st two rows up along opposite edge (bottom corner safety created). Fasten off.
Creating Top Corner Safety
Following Schematic B and with CC held double, attach with sl st 1 ½ (2, 2 ½)” below foam board insert along edge of tablet cover opposite tablet lip. Ch 7 (9, 11) and attach 1 (1 ½, 2)” above and to the right of attachment point. Fasten off.
Attaching Motifs
Following Schematic B, with WS of motifs facing, thread 10” tails of motifs into tapestry needle and attach motifs to edges of tablet cover; attach rest of motifs and buttonhole motifs to motifs attached to tablet edge. Fold foam board insert over inside of tablet cover. Fold motifs over foam board insert so they are now on front of tablet cover with RS facing. Using motifs as guide, position buttons on top cover, marking position with straight pins. Thread sewing needle with thread and attach buttons where indicated.
Weave in ends. 