


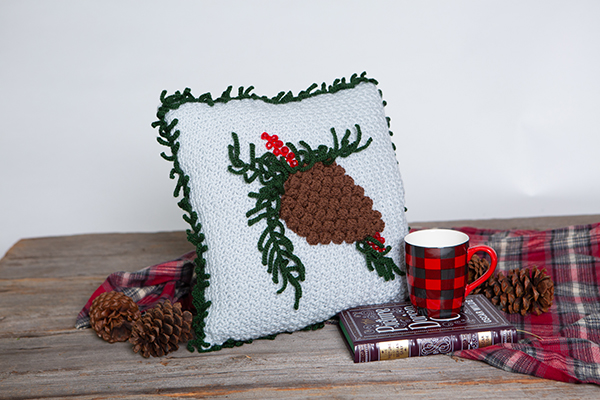
Dress up your cabin with this pillow featuring a dimensional pinecone nestled between wisps of pine branches, colorful berries and a unique pine needle edging. It’s the perfect accent pillow for your home or cabin for fall and winter.
Do you knit as well? Be sure to check out the knit version of this pillow in the October issue of I Like Knitting magazine.
Skill Level: Intermediate
Size: Fits 16” x 16” pillow insert
Gauge: 16 (sc, dc) sts and 14 rows = 4” [10 cm] using US size G/6 (4.25 mm) hook
Gauge using other hook sizes is not important.
Materials

Yarn: Paintbox Yarn Simply Aran (100% Acrylic; 201 yards [184 meters]/100 grams): #204 Stormy Grey (MC, 3 balls), #210 Coffee Bean (C1, 1 ball)

Paintbox Simply DK (100% Acrylic; 302 yards [276 meters]/100 grams): #127 Racing Green (C2, 1 ball)

DMC Petra Cotton Thread Size 5 (100% Cotton; 437 yards [400 meters]/100 grams): #5321 Red (C3, 5 yards)
Hook: US size J/10 (6.0 mm), US size G/6 (4.25 mm), US size C (2.75 mm)
Notions: Fairfield Poly-fil® Home Elegance™ 16” x 16” pillow insert, tapestry needle, 14 transparent red 8 mm acrylic multifaceted beads, blocking supplies, safety pin
Pattern Notes
Weave in ends as work progresses, unless otherwise stated.
Special Stitches
Bobble in first st: Ch 3, [yo, insert hook in first st of row, pull up lp, yo, draw through 2 lps on hook] 4 times, yo, draw through all 5 lps on hook.
Bobble: [Yo, insert hook in indicated st, pull up lp, yo, draw through 2 lps on hook] 5 times, yo, draw through all 6 lps on hook.
Pattern
Pillow Panels (make 2)
With MC and US size G/6 (4.25 mm) hook, ch 61.
Row 1: Sc in 2nd ch from hook, dc in next ch, [sc in next ch, dc in next ch] across, turn. (60 sts)
Row 2: Ch 1, sc in first st, dc in next st, [sc in next st, dc in next st] across, turn.
Rows 3-54: Rep Row 2.
Fasten off at end of last row.
Pinecone (make 1)
With C1 and US size J/10 (6.0 mm) hook, ch 10.
Row 1: Sc in 2nd ch from hook and in each ch across, turn. (9 sc)
Row 2: Bobble in first st, [sc in next st, bobble in next st] 4 times, sc in same st as last bobble made, turn. (5 bobbles, 5 sc)
Row 3: Ch 1, sc in first st, [sk bobble, 2 sc in next st] across, 2 sc in top of last bobble, turn. (11 sc)
Row 4: Bobble in first st, [sc in next st, bobble in next st] across, sc in same st as last bobble made, turn. (6 bobbles, 6 sc)
Rows 5-8: Rep Rows 3- 4 twice. (8 bobbles, 8 sc))
Row 9: Ch 1, sk first sc, [sk next bobble, 2 sc in next sc] 6 times, sk next bobble, sc in next sc, sk last bobble, turn. (13 sc)
Row 10: Rep Row 4. (7 bobbles, 7 sc)
Row 11: Ch 1, sk first sc, [sk next bobble, 2 sc in next sc] 5 times, sk next bobble, sc in next sc, sk last bobble, turn. (11 sc)
Row 12: Rep Row 4. (6 bobbles, 6 sc)
Row 13: Ch 1, sk first sc, [sk next bobble, 2 sc in next sc] 4 times, sk next bobble, sc in next sc, sk last bobble, turn. (9 sc)
Row 14: Rep Row 4. (5 bobbles, 5 sc)
Row 15: Ch 1, sk first sc, [sk next bobble, 2 sc in next sc] 3 times, sk next bobble, sc in next sc, sk last bobble, turn. (7 sc)
Row 16: Rep Row 4. (4 bobbles, 4 sc)
Row 17: Ch 1, sk first sc, sk next bobble, [sc in next st, sk next bobble] 3 times, turn. (3 sc)
Row 18: Bobble in first st, sc in next st, bobble in last st, sc in same st as last bobble made, turn. (2 bobbles, 2 sc)
Row 19: Ch 1, sk first sc, sk next bobble, sl st in next sc, sk last bobble, turn. (1 sl st)
Row 20: Bobble in first st, sc in same sl st. (1 bobble)
Fasten off.
Pine Needle Branch (make 1 branch each: 3” long, 7” long, 10” long)
With US size C (2.75 mm) hook and C2, ch 12.
Row 1: Sl st in 2nd ch from hook and in each of next 10 ch, turn. (first pine needle made, 11 sl sts)
Row 2: Do not ch at beg of row, sl st in first st, ch 12, sl st in 2nd ch from hook and in each of next 10 ch, turn. (2nd pine needle made, 11 sl sts)
Rep Row 2 to indicated length.
Fasten off, leaving 18” tail.
Pine Needle Edging
With US size C (2.75 mm) hook and C2, ch 8 sts.
Row 1: Sl st in 2nd ch from hook and in each of next 6 chs, turn. (pine needle made, 7 sl sts)
Row 2: Sl st in first st, ch 8, sl st in 2nd ch from hook and in each of next 6 chs, turn. (2nd pine needle made, 7 sl sts)
Rep last row until piece meas approx. 62”.
Remove lp from hook and place on a safety pin.
Upper Berry Spray
Row 1: Use tapestry needle to string 9 beads onto C3, with US size C (2.75 mm), ch 2, sc in 2nd ch from hook, working with a tight tension throughout, slide bead up close to lp on hook, ch 2, turn.
Row 2: Sc in between bead and first ch of last ch-2 made, turn.
Row 3: Slide bead up close to lp on hook, ch 2, turn.
Row 4: Sc in between bead and first ch of last ch-2 made, turn.
Rows 5-18: Rep Rows 3-4 until all beads are added.
Fasten off, leaving a long tail.
Lower Berry Spray
String 5 beads onto C3 and rep Rows 1-10 same as for Upper Berry Spray until all 5 beads are added.
Fasten off, leaving a long tail.
Finishing
Place Pillow Panels WS together, use MC and tapestry needle to whip stitch outer edges together, inserting pillow insert before closing.
Position Pinecone onto Pillow Front using photo as a guide or where desired. Use C1 and tapestry needle to sew outer edges to Pillow.
Using photo as guide, place 10” Pine Needle Branch to top right of pinecone and downward along right side edge; 7” Branch along upper left top edge of pinecone and 3” Branch on lower left of pinecone and use yarn tails to sew center of branches to Pillow with short back stitches.
Use C2 to sew Pine Needle Edging over whip stitches seam of Pillow in same manner.
Note: Do not sew pine needle ends down.
Ease edging around corners or where desired for additional fullness. If edging length is too long, remove lp from safety pin and unravel to desired length fasten off and complete sewing onto Pillow. If more edging is desired, remove lp from safety pin and work more reps of Pine Needle Edging Row 2 to desired length, fasten off and complete sewing onto Pillow.
Place Berry Sprays where desired onto Pillow, use tapestry needle and thread tails to sew center of spray to Pillow, being sure to catch threads that go through center of bead to secure snugly into position.