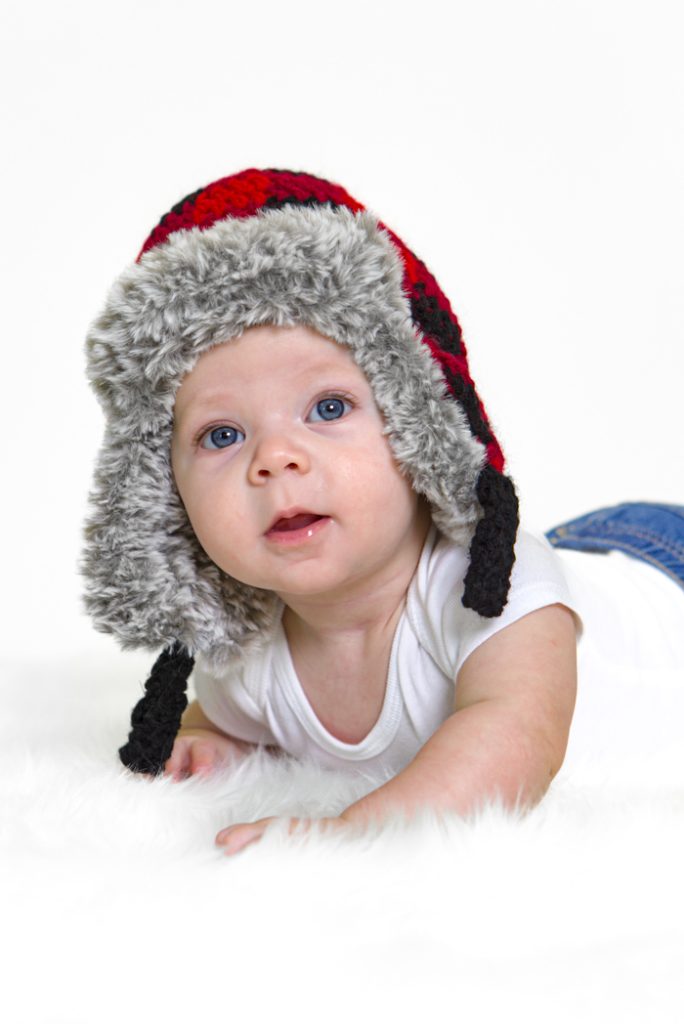
The thickest, warmest baby hat for your little lumberjack is here! This unisex hat is created using two layers: a plaid, wool outer layer and a thick faux fur lining that’s extra soft against a baby’s skin. A snap closure completes the look for extra chilly days at the cabin.
Skill Level: Intermediate
Size: 16” circumference
Gauge: 12 sts and 8 rows = 4” [10 cm] in dc with smaller hook and worsted weight yarn
7 sts and 8 rows = 4” [10 cm] in sc with larger hook and fur yarn
Materials
 Yarn: Lion Brand Wool-Ease (80% Acrylic, 20% Wool; 197 yards [180 meters]/85 grams): #138 Cranberry (MC, 1 skein), #153 Black (CC1, 1 skein), #102 Ranch Red (CC2, 1 skein)

Lion Brand Go For Faux (100% Polyester; 64 yards [60 meters]/100 grams): #201 Grey Wolf (CC3, 1 skein)
Hook: US size K/10.5 (6.50 mm), US size M/N (9.0 mm)
Notions: Tapestry needle, stitch markers, ½” snap, sewing needle, matching thread
Pattern Notes
Rounds are not joined unless noted.
Place stitch marker in first st of each round to keep track.
If only one number is given that number applies to both sizes.
When working the plaid, the unused color is carried along the line of crochet stitches and crocheted over. To keep the look uniform, on the last st of that color, draw the contrasting color through the last 2 loops.
When working a dc2tog over two different colors, use the same color as the previous st to start the first dc, then draw the contrasting color through the last 2 loops of that st and finish the dc2tog with the next color.
Pattern
Plaid Shell
Left Earflap
With smaller hook and CC2, ch 10.
Row 1: Dc in 4th ch from hook and next 2 ch, dc 4 in MC, turn. (8 sts)
Row 2 (Inc): Ch 3 with MC, dc CC1 in first 4 sts, dc MC in next 4 sts, dc CC1 in last st, turn. (10 sts)
Row 3 (Inc): Ch 3 with CC1, dc CC1 in first st, dc MC in next 4 sts, dc CC1 in next 4 sts, 2 dc in MC in last st, turn. (12 sts)
Row 4: Ch 3 with CC2, sk first dc, dc CC2 in next st, dc MC in next 4 sts, dc CC2 in next 4 sts, dc MC in next 2 sts, turn.
Row 5: Ch 3 with MC, sk first dc, dc MC in next st, dc CC2 in next 4 sts, dc MC in next 4 sts, dc CC2 in next 2 sts.
Fasten off.
Right Earflap
With smaller kook and CC2, ch 10.
Row 1: Dc in 4th ch from hook with CC2, dc MC in next 4 ch, dc CC2 in last 2 ch, turn. (8 sts)
Row 2 (Inc): Ch 3 with MC, dc MC in first 3 sts, dc CC1 in next 4 sts, dc MC in next st, 2 dc MC in last st, turn. (10 sts)
Row 3 (Inc): Ch 3 with MC, dc MC in first 3 sts, dc CC1 in next 4 sts, dc MC in next 2 sts, 2 dc MC in last st, turn. (12 sts)
Row 4: Ch 3 with CC2, sk first dc, dc CC2 in next 3 sts, dc MC in next 4 sts, dc CC2 in next 4 sts, turn.
Row 5: Rep Row 4.
Do not fasten off. Cont to Joining Rnd.
Joining Rnd
Change to CC1
Rnd 1: Ch 10 (for Back), sc across first Earflap, ch 14 (for Front), sc across 2nd Earflap. (48 sts)
Rnds 2-7: Working in Plaid Pattern, ch 3, work even in dc. Join with sl st to first st.
Shape Crown
Cont working in Plaid Pattern.
See notes about dec over 2 color sections.
Rnd 1: *Sc 4, sc2tog; rep from * around. (40 sts)
Rnd 2: *Sc 3, sc2tog; rep from * around. (32 sts)
Rnd 3: *Sc 2, sc2tog; rep from * around. (24 sts)
Rnd 4: *Sc, sc2tog; rep from * around. (16 sts)
Rnd 5: *Sc2tog; rep from * around. (8 sts)
Rnd 6: *Sc2tog; rep from * around. (4 sts)
Cut yarn, leaving a long tail. Draw tail through last 4 sts and pull tight to close.
Fur Lining
Earflap (make 2)
With CC3 and larger hook, ch 5.
Row 1: Sc in 2nd ch from hook and each ch across, turn. (4 sts)
Row 2: Ch 1, 2 sc in first st, sc to last st, 2 sc in last st, turn. (6 sts)
Row 3: Ch 1, sc in each st across, turn.
Row 4: Rep Row 2. (8 sts)
Row 5: Rep Row 3.
Fasten off first Earflap.
Do not fasten off 2nd Earflap.
Joining Rnd
Rnd 1: Ch 4 (for Back), sc across first Earflap, ch 8 (for Front), sc across 2nd Earflap. (28 sts)
Rnds 2-7: Sc in continuous rnds.
Shape Crown
Rnd 1: *Sc 5, sc2tog; rep from * around. (24 sts)
Rnd 2: *Sc 4, sc2tog; rep from * around. (20 sts)
Rnd 3: *Sc 3, sc2tog; rep from * around. (16 sts)
Rnd 4: *Sc 2, sc2tog; rep from * around. (12 sts)
Rnd 5: *Sc, sc2tog; rep from * around. (8 sts)
Rnd 6: *Sc2tog; rep from * around. (4 sts)
Cut yarn, leaving a long tail. Draw tail through last 4 sts and pull tight to close.
Chin Straps
With smaller hook, CC1 and RS facing, join yarn in 4th dc of bottom of Earflap, ch 1.
Row 1: Sc in same st as join and next st, turn.
Rows 2-20: Ch 1, sc 2, turn.
Fasten off. Fold in half and stitch with yarn tail.
Rep for 2nd Earflap.
Joining the layers
Place the Fur Lining inside the Plaid Shell. With RS facing and larger hook, join CC3 at bottom of one Earflap. Sc evenly around, catching both layers of fabric and working 2 sc in corners, sc only in the Fur Lining behind the Chin Straps, join to first sc with sl st.
Fasten off.
Front Flap
With larger hook and CC3, ch 11.
Row 1: Sc in 2nd ch from hook and each ch across. (10 sts)
Rows 2-3: Work even in sc.
Fasten off.
Sew to front of hat as seen in photos, being sure to go through both layers of hat.
Finishing
Sew snaps on chin straps.
Weave in ends.


I like! My granddaughter is 2 going on 3. Her head circumference would probably be more like 18″; I can tweak your pattern and add 6 sts to the crown (46 instead of 40) and add one more round of decreases. Should I add sts to the earflaps, too?
I, too, would like to see this in an adult size. Guess I’ll create my own. ????
Great look! Do you have this in adult sizes?
Glad you like it! We don’t currently have larger sizes at this time. – Nicola, Editor