

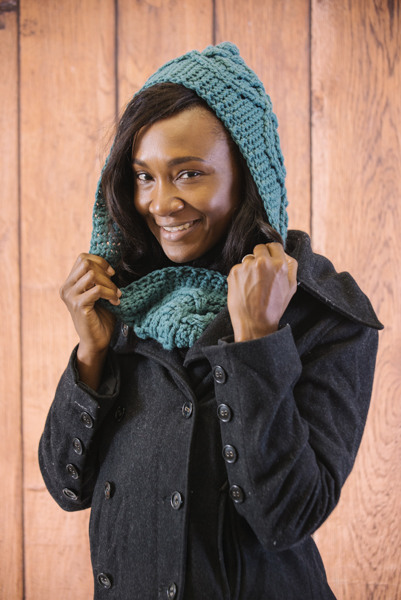
If you’ve never crocheted cables before, this is a perfect first crochet cable pattern. The scarf portion is made straight and long, then the center portion is sewn up to make a hood. If you prefer your scarves sans hood, simply skip this step and you’ll have a nice long accessory to wear all season.
Skill Level: Intermediate
Size: Finished measurements 60 (70)” / [152.5 (178) cm] length x 9½” / [24 cm] width
Shown in 60″ length
Gauge: 23 sts = 7.5″ / [19 cm] and 12 rows = about 5″ / [12.5 cm] in Cable Panel.
Materials
Yarn:
![]() Quince & Co. Osprey (100% American Wool; 170 yards [155 meters]/100 grams): Aleutian, 4 (5) skeins
Quince & Co. Osprey (100% American Wool; 170 yards [155 meters]/100 grams): Aleutian, 4 (5) skeins
Hook: US size K/10½ (6.5 mm)
Notions: Tapestry needle; removable stitch marker
Abbreviations
ch (chain): Wrap the yarn around the crochet hook (yarn over) and draw it through the loop on the hook to form the first chain. Rep this step as many times as instructed. (The loop on the hook is never included when counting the number of chains)
fpdc (front post double crochet): Yo hook, insert hook from front around the indicated st, yo and pull up a loop, (yo, draw through 2 loops on hook) 2 times.
fptr (front post treble crochet): Yo hook 2 times, insert hook from front around the indicated st, yo, pull up a loop, (yo, draw through 2 loops on hook) 3 times.
fpdtr (front post double treble crochet): Yo hook 3 times, insert hook from front around the indicated st, yo, pull up a loop, (yo, draw through 2 loops on hook) 4 times.
fpttr (front post triple treble crochet): Yo hook 4 times, insert hook from front around the indicated st, yo, pull up a loop, (yo, draw through 2 loops on hook) 5 times.
sc (single crochet): Insert hook in indicated st, yo, pull up a loop, yo, draw through both loops on hook.
sk: skip
Special Stitches
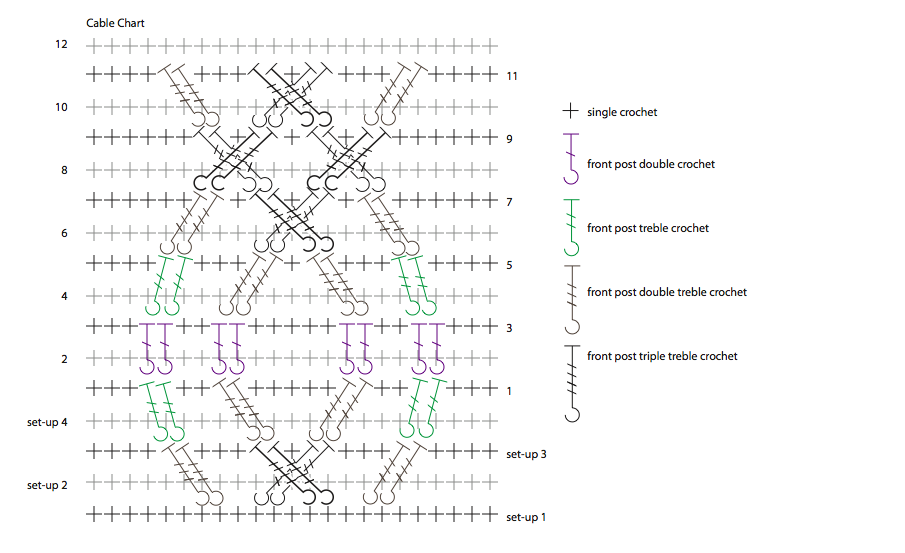
Cable Panel (panel of 23 sts)
(also, see chart)
Set-up Row 1 (RS): Ch 1, sc in second st from hook, sc into each ch to end, turn.
Set-up Row 2 and all wrong side rows: Ch 1, sc into each st to end, turn.
Set-up Row 3: Ch 1, sc in next 4 sts, (work fpdtr into st 2 rows below, 2 sts to the left) 2 times, sk the next 2 sc on current row, sc in next 3 sts, (fpttr into st 2 rows below, 3 sts to the left) 2 times, sk next 2 sc on current row, sc in next sc, (fpttr into st 2 rows below, 3 sts to the right) 2 times, sk next 2 sc on current row, sc in next 3 sts, (fpdtr into st 2 rows below, 2 sts to the right) 2 times, sk next 2 sc on current row, sc in next 4 sts to end, turn.
Row 1: Ch 1, sc in next 3 sts, (fptr around next fpdtr from 2 rows below) 2 times, sk next 2 sc on current row, sc in next 2 sts, (fpdtr around next fpttr from 2 rows below) 2 times, sk next 2 sc on current row, sc in next 5 sts, (fpdtr around next fpttr from 2 rows below) 2 times, sk next 2 sc on current row, sc in next 2 sts, (fptr around next fpdtr from 2 rows below) 2 times, sk next 2 sc on current row, sc in next 3 sts to end, turn.
Row 3: Ch 1, sc in next 3 sts, (fpdc around next fptr from 2 rows below) 2 times, sk next 2 sc on current row, sc in next 2 sts, (fpdc around next fpdtr from 2 rows below) 2 times, sk next 2 sc on current row, sc in next 5 sts, (fpdc around next fpdtr from 2 rows below) 2 times, sk next 2 sc on current row, sc in next 2 sts, (fpdc around next fptr from 2 rows below) 2 times, sk next 2 sc on current row, sc in next 3 sts to end, turn.
Row 5: Ch 1, sc in next 4 sts, (fptr around next fpdc from 2 rows below) 2 times, sk next 2 sc on current row, sc in next 3 sts, (fpdtr around next fpdc from 2 rows below) 2 times, sk next 2 sc on current row, sc in next st, (fpdtr around next fpdc from 2 rows below) 2 times, sk next 2 sc on current row, sc in next 3 sts, (fptr around next fpdc from 2 rows below) 2 times, sk next 2 sc on current row, sc in next 4 sts to end, turn.
Row 7: Ch 1, sc in next 6 sts, (fpdtr around next fptr from 2 rows below) 2 times, sk next 2 sc on current row, sc in next st, sk next 2 fpdtr, work (fpttr into the following fpdtr from 2 rows below) 2 times, sk 2 sc on the current row, sc in next st, fpttr into the first skipped fpdtr from 2 rows below, then fpttr into the second skipped fpdtr, sk 2 sc on current row, sc in next st, (fpdtr into next fptr from 2 rows below) 2 times, sk 2 sc from current row, sc in next 6 sts to end, turn.
Row 9: Ch 1, sc in next 6 sts, sk next 2 fpdtr, work (fpttr into the following fpttr from 2 rows below) 2 times, sk 2 sc on the current row, sc in next st, fpttr into the first skipped fpdtr inserting hook underneath the previous 2 fpttr sts worked on this row, fpttr into the second skipped fpdtr inserting hook underneath the previous 2 fpttr sts worked on this row, sk 2 sc on current row, sc in next st, sk next 2 fpttr, work (fpttr into the following fpdtr from 2 rows below) 2 times, sk 2 sc on the current row, sc in next st, fpttr into the first skipped fpttr inserting hook underneath the pervious 2 fpttr sts worked on this row, fpttr into the second skipped fpttr inserting hook underneath the previous 2 fpttr sts worked on this row, sk 2 sc on current row, sc in next 6 sts to end, turn.
Row 11: Ch 1, sc in next 4 sts, (fpdtr around next fpttr from 2 rows below) 2 times, sk 2 sc on current row, sc in next 3 sts, sk next 2 fpttr, work (fpttr into the following fpttr from 2 rows below) 2 times, sk 2 sc on the current row, sc in next st, fpttr into the first skipped fpttr from 2 rows below, fpttr into the second skipped fpttr, sk 2 sc on current row, sc in next 3 sts, (fpdtr around next fpttr from 2 rows below) 2 times, sk next 2 sc on current row, sc in next 4 sts to end, turn.
Row 12: Ch 1, sc in each st to end, turn.
Rep Rows 1–12 for pattern.
Pattern
Scarf
Before beginning, cut about a length of yarn, about a yard long. This will be used to use to seam the hood, while keeping the ball of yarn attached to the scarf to complete the border.
Ch 24, turn.
Work Rows 1-12 of Cable Panel 11 (13) times, then work Rows 1-7 once more.
Place a removable stitch marker into the live stitch and keep yarn attached for border.
Block piece to measure 7½” [19 cm] wide by 58 (68)” / [147.5 (172.5) cm] long.
Seam the Hood
Fold scarf in half. Measure 10″ from the fold and use removable stitch markers to pin the 2 pieces of fabric together from the fold along the 10″. (Note: Pin along the same edge of the scarf where the yarn is still attached.) Use the length of yarn that was cut at the beginning of the scarf to seam the 2 pieces together along the pinned edge, being careful not to make the seam too bulky.
Border
Return held stitch to hook and pull tail so it’s snug around the hook.
Cont working around the outside edge of the scarf with the right side facing as follows:
Rnd 1: Rotate work 90º clockwise to begin working along the selvedge edge. Ch 1, work 1 sc into the side of each row to 1 row before the hood fold, work sc3tog into the next row, the seam, then the first row after the fold, then work 1 sc into the side of each row to the other end of the scarf, work 3 sc into the corner, work 1 sc into each sc along the foundation chain edge of the scarf, working 3 sc into the next corner, work 1 sc into the side of each row to the end of the scarf, working 3 sc into the next corner, then work 1 sc into the top of each st along the last edge, working 2 sc into the last st (which is the same st used for the first sc of this round), sl st into the first sc to join. Do not turn.
Rnd 2: Ch 2 (counts as 1 dc), *work bpdc around next sc, work fpdc around next sc; rep from * around, working 3 sts around each corner st, sl st into first st to join.
Fasten off.
Finishing
Weave in ends. Block again if desired.