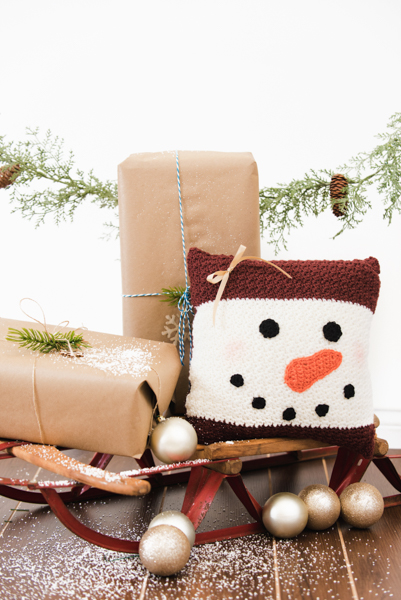
Decorate your home for the winter season with this adorable snowman pillow. Made in traditional colors, this pillow can be used not only for the Christmas season but all winter long!
Skill Level: Easy
Size: 14” x 14”
Gauge: 20 sts and 20 rows = 4” [10 cm] in sc
Materials
Yarn:
![]() Cascade Yarns Cascade 220 Superwash (100% Wool; 220 yards [200 meters]/100 grams): 230 Port (C1), 2 skeins; 871 White (C2), 1 skein; 822 Orange (C3), 1 skein; 815 Black (C4), 1 skein.
Cascade Yarns Cascade 220 Superwash (100% Wool; 220 yards [200 meters]/100 grams): 230 Port (C1), 2 skeins; 871 White (C2), 1 skein; 822 Orange (C3), 1 skein; 815 Black (C4), 1 skein.
Hook: US size 7 (4.5 mm)
Notions: Removable markers; tapestry needle; 14” x 14” filler pillow; blush (for cheeks); 6” ribbon (optional)
Pattern Notes
The pillow is made in 2 panels. The nose, eyes, and mouth are sewn onto the front panel, and then the panels are sewn around the filler pillow. Weave in ends as pattern progresses.
Pattern
Back Panel
With C1, ch 47.
Row 1: Sc in 2nd ch from hook and in each ch across – 46 sts.
Rows 2-43: Ch 1, turn, *sc in next st, dc in next st; rep from * across.
Row 44: Ch 1, turn, sc in each st across.
Fasten off.
Front Panel
With C1, ch 47.
Row 1: Sc in 2nd ch from hook and in each ch across – 46 sts.
Rows 2-14: Ch 1, turn, *sc in next st, dc in next st; rep from * across. Join C2, fasten off C1.
Rows 15-37: Ch 1, turn, *sc in next st, dc in next st; rep from * across. Join C1, fasten off C2.
Rows 38-43: Ch 1, turn, *sc in next st, dc in next st; rep from * across.
Row 44: Ch 1, turn, sc in each st across. Fasten off.
Nose
With C3, ch 2.
Row 1: Work 2 sc in the first ch – 2 sts.
Row 2: Ch 1, turn, 2 sc in the first st, 2 sc in the next st – 4 sts.
Row 3: Ch 1, turn, sc in each st across – 4 sts.
Row 4: Sc2tog, sc in next st, 2 sc in last st – 4 sts.
Row 5: Ch 1, turn, sc in each st across – 4 sts.
Row 6: Turn, sc2tog, sc in next st, 2 sc in last st – 4 sts.
Row 7: Ch 1, turn, 2 sc in first st, sc in next 3 sts – 5 sts.
Row 8: Ch 1, turn, sc in 4 sts, 2 sc in last st – 6 sts.
Row 9: Ch 1, turn, 2 sc in first st, sc in next 4 sts, 2 sc in last st – 8 sts.
Row 10: Turn, sc2tog, sc in next 4 sts, sc2tog – 6 sts.
Row 11: Turn, sc2tog, sc in next 2 sts, sc2tog – 4 sts.
Row 12: (Sc2tog) 2 times.
Trim
Working on the edge of sts, sc in each st around Nose, sl st to first st to join.
Fasten off, leaving 18” tail.
Mouth (make 5)
With C4, ch 2.
Rnd 1: Work 8 sc in the first ch, sl st to the first st to join – 8 sts.
Fasten off, leaving 12” tail.
Eyes (make 2)
With C4, ch 4.
Rnd 1: Work 10 dc in the first ch, sl st to first st to join – 10 sts.
Fasten off, leaving 12” tail.
Using stitch makers, place the eyes, nose, and mouth in place. Using the yarn needle, sew them into place.
Finishing
Use the stitch markers to pin the panels around the filler pillow. Using the mattress stitch, stitch the panels together.
Next, use the blush to create red cheeks in approx. 1½” circle
Last, tie ribbon into bow at corner of pillow above white section. 


What is the “mattress” stitch, please?
Hi Kathryn, here is a video about this stitch, used for seaming! https://www.ilikecrochet.com/previews/suncrisp-appleghan-joining-squares/
-Nicola, Editor
Love to get the book
I can’t wait to make this, I think I will make 2 and leave the ribbon off of one of them and have a girl and boy .
Love your santa pillow. Have not seen anything like it before. I can wait to get started on it. Thank you for sharing the pattern with me. Have a Happy Holiday season.
can’t wait to try making this for my grandchildren
I had been looking for a re-cover to use for the holidays for the throw pillow in my swivel/rocker and ran across this. I love it ! Thank you so very much ! It will go perfectly with the Santa lap-throw I have draped over the chair 🙂
I love snow-peeps! I WAS going to hang winter curtains this weekend…but this snowman is going to be more fun to make! Thanks Kristi, great design!!