


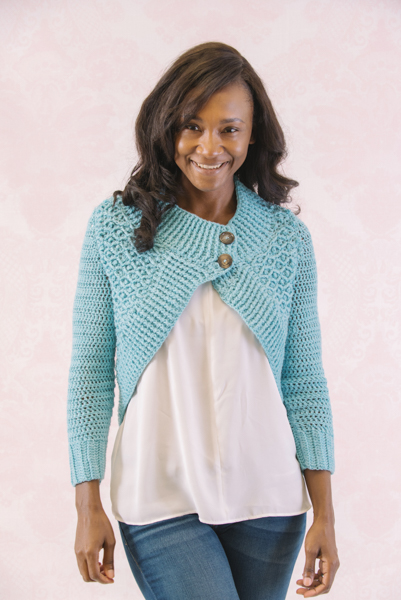
Turn heads with this stylish and chic sweater. It is one of those sweaters that looks complicated but is fun to make and wear. This will be a staple go-to piece in every wardrobe.
Skill Level: Advanced
Size: Finished Bust Size 30 (34, 38, 42, 46, 50, 54, 58)” to fit bust 28 (32, 36, 40, 44, 48, 58, 56)”
1-2” positive ease recommended.
Shown in size 34”
Gauge:
14 sts and 10 rows = 4” [10 cm] in Double Crochet
15 sts and 16 rows = 5” in Diamond Pattern
Materials
Yarn:
![]() Knit Picks Swish Worsted (100% Superwash Merino Wool; 110 yards [101 meters]/50 grams): 26067 Wonderland Heather, 10 (11, 12, 13, 14, 15, 16, 17) balls
Knit Picks Swish Worsted (100% Superwash Merino Wool; 110 yards [101 meters]/50 grams): 26067 Wonderland Heather, 10 (11, 12, 13, 14, 15, 16, 17) balls
Hook: US size H/8 (5 mm)
Notions: Tapestry needle; two 1” (25 mm) button; two removable stitch markers; one 4/0 sew-on snaps (optional)
Special Stitches
Diamond Pattern
Setup Row (RS): Sc in 2nd ch from hook, sc in next 2 ch, *Psc in next ch, sc in next 3 sts; rep from * across to end of row, turn.
Row 1 (WS): Ch 3 (count as dc), sk first st, dc in each st across to end of row, turn.
Row 2: Ch 1, sc in first st, *Psc in next st, sc in next st **, tr/rf2tog over next st inserting hook around 2nd sc in Setup Row for first leg and around skipping 3 sts on Setup Row, sc in 4th sc for 2nd leg, sc in next st; rep from * across row, ending last rep at ** in top of tch, turn.
Rows 3 and 5: Rep Row 1.
Row 4: Ch 1, sc in first st, tr/rf over next st inserting hook around top of first raised treble cluster 2 rows below, *sc in next st, Psc in next st, sc in next st **, tr/rf2tog over next st inserting hook around same cluster as last raised st for first leg and around the top of the next raised treble cluster for 2nd leg; rep from * across row, ending rep at ** when 2 sts rem, tr/rf over next st inserting hook around top of same treble cluster as last raised st, sc into top of tch, turn.
Row 6: Ch 1, sc in first st, *Psc in next st, sc in next st **, tr/rf2tog over next st inserting hook around top of first raised treble cluster 2 rows below for first leg and around top of next raised treble cluster for 2nd leg, sc in next st; rep from * across row, ending last rep at ** in top of tch, turn.
Rep Row 3-6 for pattern.
1×1 Rib Pattern
Row 1: Ch 3, dc in next st, *FPdc around post of next st, BPdc around post of next st; rep from * across row to last st, dc, turn.
Row 2: Ch 3, dc in next st, BPdc around each bpdc st, FPdc around each fpdc st across row to last st, dc, turn.
Rep Row 2 for pattern.
List and explain any non-standard stitches.
TR/rf (raised treble crochet at front of the fabric) – (YO) twice, insert hook from in front and from right to left around the stem of stitch indicated and complete the treble stitch normally.
tr/rf2tog (raised treble crochet at front of the fabric 2 tog) – (YO) twice, insert hook in indicated st, yo, draw loop through, yo, draw through 2 loops, (yo) twice, insert hook around stem of indicated st, yo, draw loop through, yo, draw through 2 loops, yo, draw through rem loops.
Psc (picot single crochet) – Insert hook, yo, draw loop through, (yo, draw through 1 loop) 3 times, yo, draw through both loops on hook. Draw picot chain loops to front of work.
Pattern Notes
The cardigan is worked in pieces, beginning with the Fronts. Each Front is worked sideways, starting at the sides. The Back is worked last to ensure the lower body is worked to the same length as Front.
Pattern
Right Front
Ch 28 (28, 32, 32, 36, 36, 40, 40).
Work Setup Row of Diamond Pattern.
Work Rows 1-4 (4, 4, 4, 6, 6, 6, 6) of Diamond Pattern, do not turn at the end of last row, ch 22 (22, 26, 26, 30, 30, 34, 34), turn, dc in 4th ch from hook, dc across ch, work Row 5 (5, 5, 5, 3, 3, 3, 3) of Diamond Pattern.
Work next RS Row in est patt.
Shape Hem
Row 1 (WS): Cont in est Diamond Pattern across to last 4 sts, turn.
Row 2 (RS): Cont in est Diamond Pattern.
Rep Rows 1-2, 1 (1, 1, 2, 2, 2, 3, 3) more times.
Shape Neckline
Row 1 (WS): Sl 6 sts, cont in est Diamond Pattern across row to last 4 sts, turn.
Row 2 (RS): Cont in est Diamond Pattern across row, turn.
Row 3: Cont in est Diamond Pattern across to last 4 sts, turn.
Rep Rows 2-3, 4 (4, 4, 4, 5, 5, 5, 5) more times.
Fasten off.
Left Front
Ch 28 (28, 32, 32, 36, 36, 40, 40).
Work Setup Row of Diamond Pattern.
Work Rows 1-4 (4, 4, 4, 6, 6, 6, 6) of Diamond Pattern.
Work Row 5 (5, 5, 5, 3, 3, 3, 3) of Diamond Pattern, do not turn at the end of last row, ch 20 (20, 24, 24, 28, 28, 32, 32), turn.
Next Row: Sk 1 ch, work in pattern (working sc instead of raised treble sts) across ch sts, work in est patt across to end of row, turn.
Shape Hem
Row 1 (RS): Sl 4 sts, cont in est Diamond Pattern across to end of row, turn.
Row 2 (WS): Cont in est Diamond Pattern across row.
Rep Rows 1-2, 1 (1, 1, 2, 2, 2, 3, 3) more times.
Shape Neckline and Hem
Row 1 (RS): Sl 4 sts, cont in est Diamond Pattern across row to last 6 sts, turn.
Row 2 (WS): Cont in est Diamond Pattern across row, turn.
Row 3: Sl 4 sts, cont in est Diamond Pattern across row.
Rep Rows 2-3, 4 (4, 4, 4, 5, 5, 5, 5) more times.
Fasten off.
Back
Fdc 53 (60, 67, 74, 81, 88, 95, 102).
Row 1: Ch 2, dc in each st across row, turn – 53 (60, 67, 74, 81, 88, 95, 102) sts.Rep Row 1 until piece meas 9¼ (9¼, 10½, 10½, 12, 12, 13¼, 13¼)” or length to match Fronts.
Shape Armhole
Row 1: Sl 6 (8, 10, 12, 14, 16, 18, 20) sts, ch 3, dc in each st across to last 6 (8, 10, 12, 14, 16, 18, 20) sts, turn – 41 (44, 47, 50, 53, 56, 59, 62) sts.
Row 2: Ch 3, dc in each st across row, turn.
Rep Row 2 until Armhole meas 6½ (6½, 8, 8, 9¼, 9¼, 10½, 10½)”.
Fasten off.
Sleeves
Cuff
Ch 17.
Row 1: Working in the blo, dc in the 4th ch and in each ch across row, turn – 14 sts.
Row 2: Ch 3, dc in blo each st across row, turn.
Rep last row 16 (16, 18, 18, 20, 20, 22, 22) more rows. At the end of last row, turn to work along selvedge edge sts.
Shape Sleeve
Row 1: Ch 3, work 28 (28, 30, 30, 32, 32, 34, 34) sts evenly across edge, turn – 28 (28, 30, 30, 32, 32, 34, 34) sts.
Rows 2-3: Ch 3, dc in each st across row, turn.
Row 4 (Inc): Ch 3, work 2 dc in next st, dc across row to 1 st before the end, 2 dc in the last st, turn – 30 (30, 32, 32, 34, 34, 36, 36) sts.
Rows 5-6: Ch 3, dc in each st across row, turn.
Rows 7-9: Rep Rows 4-6 – 32 (32, 34, 34, 36, 36, 38, 38) sts.
Row 10: Rep Row 4 – 34 (34, 36, 36, 38, 38, 40, 40) sts.
Rows 11-14: Ch 3, dc in each st across row, turn.
Row 15: Rep Row 4 – 36 (36, 38, 38, 40, 40, 42, 42) sts.
Rep Rows 11-15, 3 (3, 4, 4, 5, 5, 6, 6) more times – 42 (42, 46, 46, 50, 50, 54, 54) sts.
Work even until piece meas 17 (17, 17½, 17½, 18, 18, 20, 20)”.
Shape Sleeve Cap
Row 1: Sl 8 (8, 9, 9, 10, 10, 11, 11) sts, ch 3, dc in each st across row to last 8 (8, 9, 9, 10, 10, 11, 11) sts, turn – 26 (26, 28, 28, 30, 30, 32, 32) sts.
Row 2: Ch 3, dc in each st across row, turn.
Row 3: Ch 3, dc2tog, dc across row to last 2 sts, dc2tog, turn – 24 (24, 26, 26, 28, 28, 30, 30) sts.
Rep last row 8 (8, 9, 9, 10, 10, 11, 11) more times – 8 sts.
Next Row: Ch 3, dc in each st across row, turn.
Rep last row until Sleeve Cap meas 4¾ (5, 5¼, 5¾, 6¼, 6¾, 7¼, 7¾)”.
Fasten off.
Block pieces. Seam shoulders and sides.
Front Edge
Set-up Row: Beg at Left Front neck edge with WS facing, join yarn, ch 3, dc evenly down along front edge, work 3 dc in side seam placing a marker on the first and the 3rd dc of the 3-dc, dc across Back, work 3 dc in next side seam placing a marker on the first and the 3rd dc of the 3-dc, dc along edge up to Right Front neck edge, taking care to avoid big gaps between dc sts, turn.
Row 1: Ch 3, work Rib Pattern across row to 3-dc at side seam, maint est Rib Pattern, work 2 sts (FPdc and BPdc) around each marked sts, replace markers on the first and last inc st, cont in est Rib Pattern across to next 3-dc, work 2 sts (FPdc and BPdc) around the marked sts, replace markers to new location, cont in Rib Pattern to end of row, turn.
Rep Row 1 until Front Edge meas 4” or desired length.
Fasten off.
Collar
Setup Row: Beg at Left Front neck, join yarn, ch 3, dc evenly across neck, turn.
Buttonhole Row: Working in Rib Pattern for 3 sts, ch 2, sk next 2 sts, cont as est in Rib Pattern across to end of row.
Next Row: Maint Rib Pattern, work across row to ch-2 sp, dc in each ch, cont in Rib Pattern to end of row, turn.
Cont in Rib Pattern for 4 rows.
Rep Buttonhole Row.
Next Row: Maint Rib Pattern, work across row to ch-2 sp, dc in each ch, cont in Rib Pattern to end of row, turn.
Fasten off
Finishing
Sew in Sleeves. Attach buttons.
(Optional) sew snaps to the inside right front of the sweater. 
Please, further explain the directions for row 2 of the diamond pattern. I get the first leg of the tr/rf2tog (tr/rf2tog inserting hook around 2nd sc of setup row) but I’m finding the directions for the second leg (and around skipping 3 stitches on setup row, sc in 4th sc for 2nd leg) very confusing. I’d love to make this sweater to wear to a wedding this fall but can’t seem to get past this point. And, I am definitely not an inexperienced crocheted. I can see the pattern this should make around the picot stitch but am not ending up with the correct number of stitches in row 2. Thank you for any help.
Hello Kathleen! I’ve reached out to the designer for advice and she or I will reply as soon as possible. Thanks! – Nicola, Editor
Hell Kathleen! From the designer:
For Row 2, you are working the tr/rf2tog st over 2 sts to create the first and second leg of the st.
The first leg is worked around the 2nd sc on the set up row. The 2nd leg is worked around the 4th sc on the setup row – count and skip 3 sts after you’ve worked the first leg.
To create the first leg of the tr/rf2tog st, work (YO) twice, insert hook in indicated st, yo, draw loop through, yo, draw through 2 loops. You should have 2 loops remaining on the hook.
Then skip the next 3 sts on the setup row to finish the second part of the tr/rf2tog st, (yo) twice, insert hook around stem of indicated st, yo, draw loop through, yo, draw through 2 loops, yo, draw through rem loops working around the 4th sc on the setup row.
Continue to work in pattern.
Hopefully this helps! – Nicola, Editor
How many ch do you start with? Directions do not state and according to size.
Hello Lynn,
Thank you for the comment. Scroll down past the stitch information to the Pattern section to find the beginning chain information. I hope this helps. Enjoy!
Thank you for this pattern, I think it will be a big hit this fall and winter.