


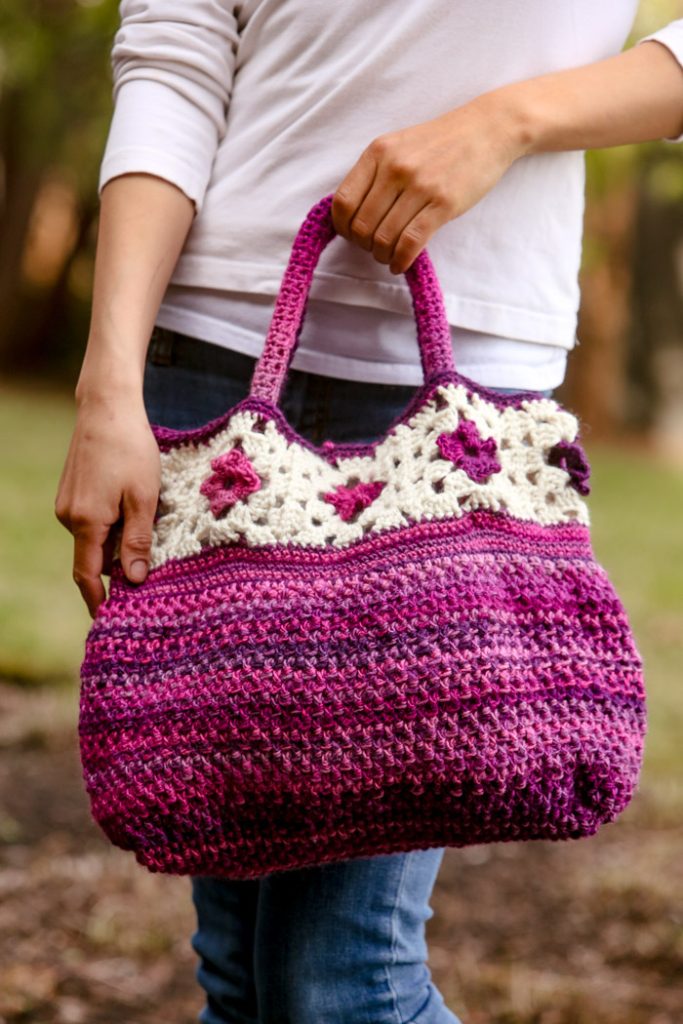
Let’s go! This bag was inspired by floral granny squares, which are crocheted first and the rest of the stitches are picked up from them.
Skill Level: Easy
Size: Approximately 16 ½” wide, 11” tall (not including handles), and 4” deep
Gauge: 16 sts and 14 rows = 4” [10 cm] in dc pat with larger hook
Granny squares = 3 ½” square with H hook after wet blocking
Materials
 Yarn: Red Heart Boutique Unforgettable (100% Acrylic; 269 yards [246 meters]/100 grams): 3950 Petunia (MC), 3 balls
Red Heart Soft (100% Acrylic; 256 yards [234 meters]/141 grams): 4601 Off-White (CC), 1 ball
Hook: US size H/8 (5.0mm) and I/9 (5.5mm)
Notions: 1 yard 3/8” jute rope; one 1/2” wooden toggle button; tapestry needle
Pattern Notes
Ch 3 at beginning of a row counts as dc unless otherwise noted.
Pattern
Granny Square (Make 8)
With smaller hook and MC, ch 8, join with sl st to form a ring.
Round 1: Ch 1, *(sc, ch 3, dc 3, ch 3, sc) in ring, ch 5; rep from * twice more, (sc, ch 3, dc 3, ch 3, sc) in ring, ch 2, dc in 1st sc. Fasten off.
Round 2: Join CC in last ch-2 sp, ch 3, 2 dc around post of dc, *ch 2, (dc 3, ch 3, dc 3) in next ch-5 sp; rep from * twice more, ch 2, 3 dc in ch-2 sp, ch 1, hdc to top of t-ch.
Round 3: Ch 3, 2 dc around post of hdc, *ch 2, dc 3 in next ch-2 sp, ch 2, (dc 3, ch 3, dc 3) in next ch-3 sp; rep from * twice more, ch 2, dc 3 in ch-2 sp, ch 2, dc 3 in ch-1 sp, ch 3, sl st to top of t-ch. Fasten off.
Block squares. Join at sides to form circle.
Body
With smaller hook and MC, join at any seam where 2 granny squares meet.
Round 1: Ch 1, sc in each st and ch-sp around, join with sl st – 120 sts.
Rounds 2-5: Ch 1, sc in each st around, join with sl st.
Round 6: Ch 1, *sc 9, 2 sc in next st; rep from * around, join with sl st – 132 sts.
Change to larger hook.
Round 7: Ch 3, dc evenly around, join with sl st to top of t-ch.
Round 8: Ch 3, *fpdc, bpdc; rep from * around to last st, fpdc, join with sl st.
Round 9: Ch 3, *bpdc, fpdc; rep from * around to last st, bpdc, join with sl st.
Repeat Rows 8-9 until piece measures 6” from hook change.
Bottom
Sl st 5 (make sure you are directly under granny square join)
Row 1: Ch 3, *fpdc, bpdc; rep from * for 46 sts, fpdc, turn – 50 sts.
Row 2: Ch 3, *bpdc, fpdc; rep from * to last st, bpdc, turn.
Rows 3-6: Repeat Rows 1-2.
Row 7: Repeat Row 1. Fasten off.
Sk next 16 sts. With larger hook and MC, join yarn in next st.
Repeat Rows 1-7 for other side of bottom. Fasten off.
Top Edge
Using smaller hook and MC, join yarn to top right corner.
Row 1: Ch 1, sc in each st and ch-sp around, join with sl st – 120 sts.
Row 2: Ch 1, sc in each st, join with sl st. Fasten off.
Handles (make 2)
Using smaller hook and MC, ch 9.
Row 1: Sc in 2nd ch from hook and each ch across, turn – 8 sts.
Row 2: Ch 1, sc in each st across, turn.
Repeat Row 2 until piece measures 19” from beg. Fasten off.
Place rope inside handle and sew long seam around rope. Sew ends shut. Sew handles inside to bottom of granny squares as seen in photo.
Sew button to top of bag in between handles.
Button Loop
Using smaller hook and MC, join yarn opposite button.
Row 1: Ch 8, sk 4 sts, sl st in next st, turn.
Row 2: Ch 1, sc in same st, sc in each ch, sc in join – 10 sc. Fasten off.
Finishing
Sew bottom seam. Fold corners and sew corner seams.
Weave in ends.
Where is the downloadable chart posted?
Hello Lani! Charts are always on the far right side of the pattern page underneath the photos. Here is a direct link to the chart as well: https://www.ilikecrochet.com/wp-content/uploads/Allons-y-Bag-chart1.png
Thanks! – Nicola, Editor
I don’t see charts on any of the patterns. Even this pattern, which has a button to push to obtain a chart. When you push the button, you get a very nice pattern with helpful directions but not the standard crochet chart that is in the link you provided in your comment. Are there charts like the one in your link available for ALL the patterns? If so, how do I access them? OMG that would be sooo helpful!
Hi Patty! I’ve just added the chart linked in the comments to the downloads section as well so it’s available! Not all the patterns have charts – it depends on the pattern itself as well as the designer. But the patterns that do have charts should have them linked in the downloads section. I hope that helps! – Dana, Editor
Really cute bag! I was wondering what it might look like if one was to use wool and felt it?! Think I might felt the bottom then add the granny squares to the top?
Just an idea. Will try it this way first though.
This came out beautifully.
For the second part of the bottom, I counted my stitches not used in the first part of the bottom, and put the second part slap bang in the centre so I had equal stitches on each side. It worked well!
I plan to line the bag and keep it aside for a Christmas present for someone.
Lovely!
Gorgeous. I may make this at some point. Have a long list of projects to finish first though! Thanks
Hi can you explain me the abbreviations
Hi Blanca! Let me know if there is a specific abbreviation you need. In the meantime, here is our list of abbreviations that you may find helpful: https://www.ilikecrochet.com/daily/beginner-crochet/tips-tutorials-and-abbreviations/crochet-abbreviations-and-special-stitches/
-Nicola, Editor
I would make this in blue and replace the flower motif with a TA.R.D.I.S motif.
Me too! As soon as I saw the name of the pattern, I was sure there was a Whovian connection!
What was the answer to the slip stitch question for the bottom? Was it 5 or 15? What was the designers answers to the questions?
I don’t understand the directions. do you have a tutorial?
Hi Donna! We don’t have a tutorial for this specific pattern at this time. Please let me know if you have a specific question and I can reach out to the designer for assistance! – Nicola, Editor
Beautiful!
Very attractive. I am going to make it for myself.
Hi iam just a bit confused on bottom of the bag did you mean slip 15 sts instead of 5 as it’s sixteen on the other side
Hello! We’ve reached out to the designer for clarification and she or I will reply as soon as possible. Thanks! – Nicola
Did you figure out if it’s 15 or 5?
Love these colors! I think it would look great in colors for each season! Will absolutely go on my to do list!!
Why can I not print the second page of your pattern.
That is such a beautiful bag. I love the colors. I will have to make it for spring.
This looks so easy, I hope I can do it.
I really like this bag please download
I love it!!!
Really cute and pattern sounds easy to follow. Eager to try after the holidays. Like the colors chosen in the example.
This is so pretty! I will make this for my daughter. These are her colors!