


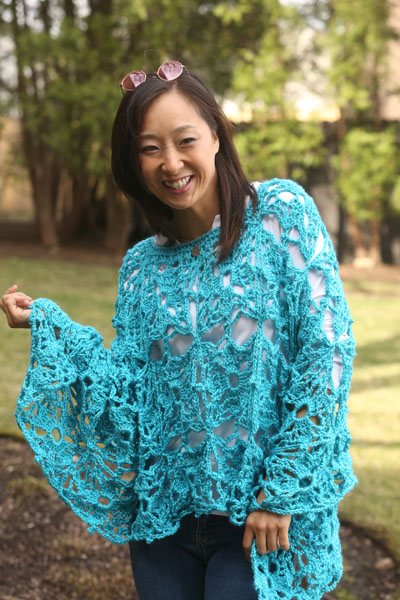
This cozy but open poncho is perfect for car rides in the sunshine. The motifs are joined as you go and it’s an easy project to throw in your bag.
Skill Level: Intermediate
Size: Each Square: 6”
Finished Poncho Measurements: Corner to corner 42” width and center neck to bottom corner 30”
Gauge: 4 sts and 2 rows = 1” square in dc
Materials
Yarn:
![]() Caron Simply Soft (100% Acrylic; 315 yards [288 meters]/170.1 grams): #9608 Blue Mint, 2 skeins
Caron Simply Soft (100% Acrylic; 315 yards [288 meters]/170.1 grams): #9608 Blue Mint, 2 skeins
Hook: US size H/8 (5 mm)
Notions: Tapestry needle
Special Stitches
5-dc Cluster: *Yarn over, push hook through next stitch (or chain), yarn over and pull back through, yarn over and pull through first 2 loops. Keep remaining loops on hook. Repeat from * 4 more times, yarn over and pull through all 6 loops on hook to complete.
6-dc Cluster: *Yarn over, push hook through next stitch (or chain), yarn over and pull back through, yarn over and pull through first 2 loops. Keep remaining loops on hook. Repeat from * 5 more times, yarn over and pull through all 6 loops on hook to complete.
Pattern Notes
Each square will be joined as you go; they will not be seamed. 2 triangles will be placed in the top center. The top opening will be trimmed to finish.
Pattern
You will create 2 large panels and join with the last 6 squares made.
Panel 1: Total of 21 squares
Square 1
Ch 10, sl st to the first ch to join.
Round 1: Ch 3 (counts as first dc), dc 4 in ring, ch 7, *dc 5, ch 7; repeat from * 2 more times, sl st to the ch-3 to join.
Round 2: Ch 4 (counts as first dc + ch 1), sk 1 st, 2 dc in next, ch 1, sk 1 st, dc, ch 2, in ch-7 sp (dc, ch 1, dc, ch 5, dc, ch 1, dc), ch 2, *over next 5 sts (dc, ch 1, sk 1 st, 2 dc, ch 1, sk 1 st, dc), ch 2, in ch-7 sp (dc, ch 1, dc, ch 5, dc, ch 1, dc), ch 2; repeat from * to end, sl st to ch-3 of first ch-4 to join.
Round 3: Ch 2 (counts as first part of cluster), 5-dc Cluster (see Special Stitches), ch 5, sl st to the first ch to create a loop, ch 4, sk 1 dc, dc in ch-1 sp, ch 3, in ch-5 sp (2 dc, ch 3, 2 dc), ch 3, dc in ch-1 sp, ch 4, sk dc, *6-dc Cluster (see Special Stitches) starting with next dc, ch 5, sl st to the first ch to create a loop, ch 4, sk 1 dc, dc in ch-1 sp, ch 3, in ch-5 sp (2 dc, ch 3, 2 dc), ch 3, dc in ch-1 sp, ch 4, sk dc; repeat from * to end, sl st to the top of 5-dc Cluster to join. Fasten off. Weave in ends.
Squares 2 to end
Ch 10, sl st to the first ch to join.
Round 1: Ch 3 (counts as first dc), dc 4 in ring, ch 7, *dc 5, ch 7; repeat from * 2 more times, sl st to the ch-3 to join.
Round 2: Ch 4 (counts as first dc + ch 1), sk 1 st, 2 dc in next, ch 1, sk 1 st, dc, ch 2, in ch-7 sp (dc, ch 1, dc, ch 5, dc, ch 1, dc), ch 2, *over next 5 sts (dc, ch 1, sk 1 st, 2 dc, ch 1, sk 1 st, dc) ch 2, in ch-7 sp (dc, ch 1, dc, ch 5, dc, ch 1, dc), ch 2; repeat from * to end, sl st to ch-3 of first ch-4 to join.
Notes: As you join, the pattern will be the same except when you join to the next square. Each row will be a little different. For instance, Row 1 will join on one side. The next rows will join on 2 sides. To join the last 6, there will be 2 or 3 side joins.
Do the following in Corners: In the ch-3 sp, 2 dc, ch 1, sl st to the next square’s ch-2 (from the ch-3 corner) in the corner, ch 1, 2 dc in ch-3 space to finish corner.
Do the following in Loops: Ch 5, remove hook from the ch, slip the ch length for loop through the next square’s completed loop and then sl st the working ch to the first ch-5 to join.
Round 3: Join as needed using above directions, ch 2 (counts as first part of cluster), 5-dc Cluster, ch 5, sl st to the first ch to create a loop, ch 4, sk 1 dc, dc in ch-1 sp, ch 3, in ch-5 sp (2 dc, ch 3, 2 dc), ch 3, dc in ch-1 sp, ch 4, sk dc, *6-dc Cluster starting with next dc, ch 5, sl st to the first ch to create a loop, ch 4, sk 1 dc, dc in ch-1 sp, ch 3, in ch-5 sp (2 dc, ch 3, 2 dc), ch 3, dc in ch-1 sp, ch 4, sk dc; repeat from * to end, sl st to the top of 5-dc Cluster to join. Fasten off. Weave in ends.
The last 6 will be the ones to join the panels.
Triangles
When the 2 panels are completed and joined, you will create 2 triangles and join as you go. They will be located here:
Join as you go with loops and corners to the top center.
Ch 8, sl st to the first ch to join.
Round 1: Ch 3 (counts as first dc), dc 4 in ring, ch 7, *dc 5, ch 7; repeat from * 1 more time, sl st to the ch-3 to join – 3 sections instead of 4.
Round 2: Ch 4 (counts as first dc + ch 1), sk 1 st, 2 dc in next, ch 1, sk 1 st, dc, ch 2, in ch-7 sp (dc, ch 1, dc, ch 5, dc, ch 1, dc), ch 2, *over next 5 sts (dc, ch 1, sk 1 st, 2 dc, ch 1, sk 1 st, dc), ch 2, in ch-7 sp (dc, ch 1, dc, ch 5, dc, ch 1, dc), ch 2; repeat from * to end, sl st to ch-3 of first ch-4 to join.
Round 3: Ch 2 (counts as first part of cluster), 5-dc Cluster, ch 5, sl st to the first ch to create a loop, ch 4, sk 1 dc, dc in ch-1 sp, ch 3, in ch-5 sp (2 dc, ch 3, 2 dc), ch 3, dc in ch-1 sp, ch 4, sk dc *6-dc Cluster starting with next dc, ch 5, sl st to the first ch to create a loop, ch 4, sk 1 dc, dc in ch-1 sp, ch 3, in ch-5 sp (2 dc, ch 3, 2 dc), ch 3, dc in ch-1 sp, ch 4, sk dc; repeat from * to end, sl st to the top of 5-dc Cluster to join.
Fasten off. Weave in ends.
Finishing
Trim
Locate top loop in center triangle in the neck opening.
Round 1: Join yarn in ch sp to left of loop, ch 3 (counts as first dc), dc 2 in same ch sp, dc 2 in next ch-3 sp, dc in next ch-1 sp, dc in join, dc in ch-1 sp, dc in next ch sp, dc 3 in next ch-3 sp, sl st in loop, *dc 3, dc 2 in next ch-3 sp, dc in next ch-1 sp, dc in join, dc in ch-1 sp, dc in next ch sp, dc 3 in next ch-3 sp, sl st in loop: repeat from * to complete the round, sl st to the first st to join – 84 sts.
Round 2: Ch 3 (counts as first dc), dc 4, dc dec, *dc 5, dc dec repeat from * to complete round – 72 sts.
Round 3: Ch 1, Reverse Single Crochet in each st, sl sl st to the first sto join.
Fasten off. Weave in ends.