

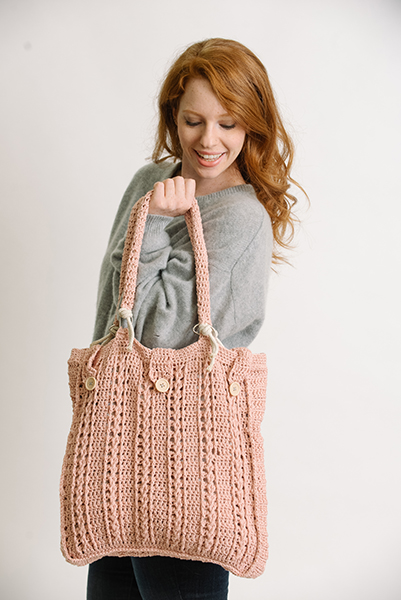
The Misty Morning Tote gets a makeover in this stunning light pink rendition featuring crocheted handles and a fabric lining. This tote bag uses Front Post treble crochets to create narrow cables separated by columns of double crochet. It’s a generous-sized tote that will fit a crochet project and other daily essentials. Make it as shown or in your favorite color.
Time: Weekend Project
Skill Level: Intermediate
Size: 15” x 15” x 3” (not including handles)
Gauge: 2 cable sections and 3 dc = 4” [10 cm], 11 rows (6 rows dc, 5 rows sc) = 4” [10 cm]
Materials
 Yarn: Debbie Bliss Piper (50% Cotton/ 50% Viscose; 218 yards [200 meters]/100 grams): 22 Blush, 4 balls
Hooks: US size I/9 (5.5 mm), G/6 (4mm)
Notions: 4- 1 yd. pieces of clothesline rope for handles; 4 D rings (1-1/2”) stitch markers; tapestry needle; three 1” buttons; sewing needle and matching thread; 1 yd. cotton fabric for lining ;sewing machine (lining could be hand sewn if you don’t have a sewing machine), straight pins
Abbreviations
Blo: Back loop only
Ch: Chain
Dc: Double crochet
Flo: Front Loop only
FPtr: Front post treble crochet
Hdc: Half Double crochet
Sc: Single Crochet
Pattern Notes
Turning chain counts as the first stitch
Crochet hook I/9 (5.5mm) is used for all except the handle. Use the G hook for the long tube that goes over the clothesline rope for the handle.
Front /Back: Make 2 pieces the same
Ch 52.
Row 1: Sc in 2nd ch from hook and in each ch across, turn – 51 sc.
Row 2: Ch 3, dc in each sc across, turn.
Row 3: Ch 1, sc in each dc across, turn.
Row 4: Ch 3, dc in first 2 sc, *FPtr around next dc of Row 2, sk next st, FPtr in next 2 dc of Row 2, working in front of the 2 FPtr just made, FPtr around the skipped st, FPtr around next dc of Row 2, dc in the next 3 sc; rep from * across, turn – 6 cable sections; 7 3-dc groups.
Row 5: Ch 1, sc in each st across, turn – 51 sc.
Row 6: Ch 3, dc in next 2 sc, *FPtr around first FPdc 2 rows below, sk next st, FPtr around next 2 FPtr from 2 rows below, working in front of 2 FPtr just made, FPtr around the skipped st, FPtr around next FPtr 2 rows below, dc in next 3 sc; rep from * across, turn.
Rows 7-41: Rep Rows 5-6. Fasten off.
Gusset
Row 1: Ch 12, sc in 2nd ch from hook and in each ch across, turn.
Row 2: Ch 3, working in Flo, dc across, turn.
Row 3: Ch 1, working in Blo, sc across, turn.
Rows 4-115: Rep Rows 2-3, ending with a Row 3. Fasten off.
Finishing
Assembly
Use stitch markers or pins to attach Gusset to one side of Tote around 2 sides and the bottom edge. With RS of cables facing, attach yarn to top corner, sc down one side joining both pieces together, *work sc in each sc row, 2 sc in side of each dc row. Repeat from * to corner, 3 sc in corner sp, sc across bottom, 3 sc in corner, repeat from * for second side. Fasten off.
Repeat to attach Back of Tote to opposite side of gusset strip.
Lining
Cut 2 pieces of fabric 16” x 16” for Front and Back, and 1 piece 48” x 4” for Gusset
Sewing
Use 5/8” seams allowance throughout.
Pin Gusset to one side of lining fabric and sew around. Clip corners and trim seam.
Sew other side of lining to opposite side of the Gusset.
Fold down a hem at the top edge and sew around.
Insert liner in bag. Pin liner to top edge of bag. Stitch lining in place with needle and thread.
Top Trim: Attach yarn in any stitch, sc around top edge of bag. Work 3 more rounds of sc around. Fasten off.
Handles: Make 2
For each handle cut 2- 36” lengths of clothesline rope. Tie an overhand knot leaving 1-1/2 “extra at end below the knot.
With G hook, Ch 8, sl st to form a ring. Leave a length of yarn at beginning to attach D Ring.
Row 1: Ch 2, hdc in each ch around. Sl st to top of ch 2.
Rows 2- 55: Ch2, hdc in each hdc around. Join with sl st.
Piece should be about 24” long. Fasten off leaving a length of yarn to attach D Ring.
Slide crochet piece over rope. Knot opposite end, same as beginning. Sew D ring to each end of handle leaving the straight side of D ring at the bottom.
Optional: Coat ends of rope with clear nail polish to prevent fraying.
Handle Tabs- (make 4)
Ch 7, sc in 2nd ch and in each ch across.
Rows 2-5: Ch 1, turn. Sc across. Leave a long piece of yarn at both ends for sewing.
Attach tab to inside of tote above the second and fourth cables on the top trim section. Place d ring over piece, bring piece forward and stitch other edge to front end of bag, encasing the d ring.
Button Closures (make 3)
Row 1: Ch 8, dc in 4th ch from hook and in each ch across, turn.
Rows 2-6: Ch 3, dc in each st across row, turn.
Row 7: Ch 1, sc in next 3 dc, ch 5, sc in last 3 dc. Fasten off.
Sew button closures to back side of Tote. Place 1 above the first cable group and 1 above the last cable group. Place the 3rd one above the 4th 3-dc group at the center of the bag.
Sew buttons to Front of bag about 2 dc rows from top edge to correspond with the button closures.
Weave in all ends.
I really like the size and love the stitches!