


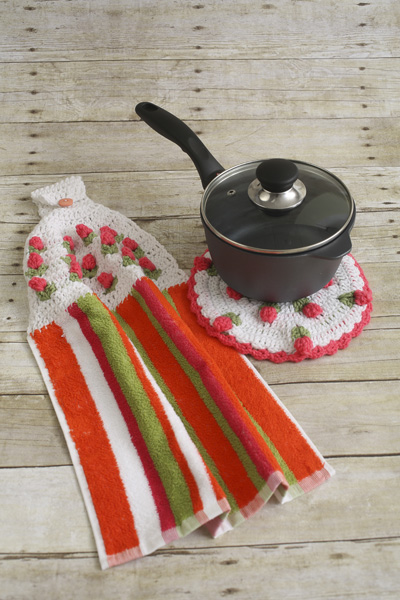
Crochet your own hotpad and towel topper with this fun and colorful set. Together, these projects are a great way to freshen up your kitchen with some fun floral hues.
Skill Level: Easy
Size: One size
Gauge: Not important
Materials
Yarn: Loops & Threads Impeccable (100% acrylic; 268 yards [245 meters]/128 grams): White (1 skein), Fern (1 skein), Arbor Rose (1 skein)
Hook: US size G/6 (4.25 mm) hook
Notions: Tapestry needle, decorative button about 7/8”, sewing needle and thread
Special Stitches
Popcorn (PC): Work 5 dc in the indicated stitch, drop loop from hook, insert hook in first dc of the 5 dc group, and then into the dropped loop, draw loop through dc, ch 1.
V Stitch: 2 dc, ch 2, 2 dc in same stitch.
Pattern Notes
When working popcorn stitches on a wrong side row, put your hook from back to front of the first dc, and then through the loop from the 5th dc, draw loop through dc, ch 1 to make the popcorns go to the back, which is the right side of the project.
When working popcorns on a right side row, put your hook from front to back of the first dc, and then through the loop from the 5th dc, draw loop through dc, ch 1 to keep the popcorns on the front side of your work.
*Work v stitches in green and popcorn stitches in flower color throughout the pattern *
Carry the green or flower color across the row you are using it in and fasten it off at the end of the row.
To change colors start the double crochet as usual – yarn over and insert hook in stitch, yarn over and pull up a loop, yarn over and pull through 2 loops then for the last yarn over of the stitch; yarn over and pull the next color through the loops to complete the double crochet with the new color.
Turning ch 3 counts as the first double crochet throughout pattern.
Hotpad Pattern
Front
Rnd 1: With white, ch 4, 11 dc in 4th ch from hook. Sl st to top of ch 3. (12 dc)
Rnd 2: Ch 3, dc in same st, *2 dc in next dc, * ch 1, 2 dc in next 2 dc. Repeat from * around. Join with sl st to top of ch 3. (24 dc, 6 ch 1 spaces)
Rnd 3: Ch 3*, dc in same dc, * skip 1 dc, V stitch in ch 1 space, skip 1 dc, dc in next dc, 2 dc in next dc. Repeat from * around ending with dc in last dc. Sl st t top of ch 3. (18 dc, 6 V stitches)
Rnd 4: Ch 3, 2 dc in next dc, dc in first dc of V stitch, * Popcorn in ch loop of V stitch, skip next dc of V stitch, dc in last dc of V stitch, 2 dc in next dc, dc in next dc, 2 dc in next dc, dc in first dc of V stitch. Repeat from * around, ending with dc in next dc, 2 dc in next dc. Sl st to top of ch 3. (42 dc, 6 Popcorns)
Rnd 5: Ch 4, dc in same dc,*dc, 2 dc in next, dc in next 3dc, 2 dc in next dc, (dc, ch1, dc) in same dc. Repeat from * around. (66 dc)
Rnd 6: Sl st into next ch 1 space, *V stitch in ch 1 space, skip 1 st, dc in next 2 dc, 2 dc in next dc, dc in next 3 dc, 2 dc in next dc, dc in next 2 dc, skip 1 dc, repeat from * around. Join with sl st to top of ch 3. Fasten off.
Rnd 7: Attach white in last dc of any V stitch, * dc in next 3 dc, 2 dc in next dc, dc in next 5 dc, 2 dc in next dc, dc in next 3 dc, Popcorn in ch loop of V stitch Repeat from * around. Join with sl st and fasten off.
Back
Rnd 1: With Fern, ch 4, 11 dc in 4th ch. Join with sl st to top of ch 3. (12 dc)
Rnd 2: Ch 3, dc in same st, 2 dc in each dc around. Join with sl st to top of ch 3. (24 dc)
Rnd 3: Ch 3,* 2 dc in next, dc in next dc, Repeat from * around. Join with sl st to top of ch 3. (36 dc)
Rnd 4: Ch 3, dc in next dc,* 2 dc in next dc, dc in next 2 dc. Repeat from * around. Join with sl st to top of ch 3. (48 dc)
Rnd 5: Repeat rnd 4. (66 dc)
Rnd 6: Ch 3, dc in next 2 dc,*2 dc I n next dc, dc in next 3 dc. Repeat from * around. Join with sl st to top of ch3. (80 dc)
Rnd 7: Ch 3, dc in same st,* dc in next 8 dc, 2 dc in next dc. Repeat from * around. Join with sl st to top of ch 3. (96 dc) Fasten off.
Hold right sides out and work through both sides to assemble.
Edge: With Amber Rose *(sc, ch 3, dc in same st), skip 2 dc, repeat from * around. For hanger ch 12, sl st to first sc. Fasten off. Weave in all ends.
Towel Topper Pattern
Cut your print kitchen towel in half. Cut a length of yarn about 4 times the width of your towel and thread into a tapestry needle. Fold raw edge of towel in about 3/8 “and blanket stitch across the towel making the stitches about 3/8* apart. You should have 48 stitches across.
Row 1 (RS): With white; attach yarn in first blanket stitch, ch 3, dc in each blanket stitch across, adjusting as needed to have 48 dc. Ch 3, turn.
Row 2 (WS): Counting turning ch as a dc, dc in the next dc,* dec 1 dc over next 2 dc, dc in next 5 dc. Repeat from * across, ending with dc in last 2 dc. Ch 3, turn. (41 dc)
Row 3 (RS): All V stitches are worked in green, other dc are in white *dc in next 3 dc, skip 1 dc, V stitch in next dc, skip 1 dc, dc in next 3 dc, repeat across ending with dc in last 4 dc. Ch 3, turn. (6 Vstitches)
Row 4 (WS): All popcorn stitches are worked in flower color *dc in next 4 dc, popcorn in center ch loop of v stitch, dc in 2nd dc of v stitch, dc in next 3 dc, dc in 1st dc of next v stitch, repeat across ending with dc in last 4 dc. (6 popcorns)
Ch 3, turn. NOTE: Be sure the popcorn stitches face the right side of your towel. See the note in Special Stitches.
Row 5 (RS): Dc in next 4 dc, working 1 dc in center of popcorn st, *dec 1 dc, dc in next 4 dc. Repeat from* across. Ch 3, turn.
Row 6 (WS): Repeat row 3. (5 V stitches)
Row 7 (RS): Repeat row 4. (5 popcorns)
Row 8 (WS): Repeat row 5.
Row 9 (RS): Repeat row 3.
Row 10 (WS): Repeat row 4. (4 V stitches)
Row 11 (RS): Repeat row 5. (4 popcorns)
Rows 12-14: Dc in next 2 dc, dec 1 dc over the next 2 dc; across. Ch 3, turn.
Rows 15-22: Dc across. Ch 3, turn.
Row 23: Sc in 5 dc, ch 3, sc in same stitch and in next 4 dc. Fasten off. Sew on button to center of row 15. Weave in all ends. 
can i print a pattern?
Hello! You are welcome to save this pattern by copying and pasting into a word document or by printing the pattern via the printer icon on the left hand side of your screen. Hope this helps! – Nicola, Editor