


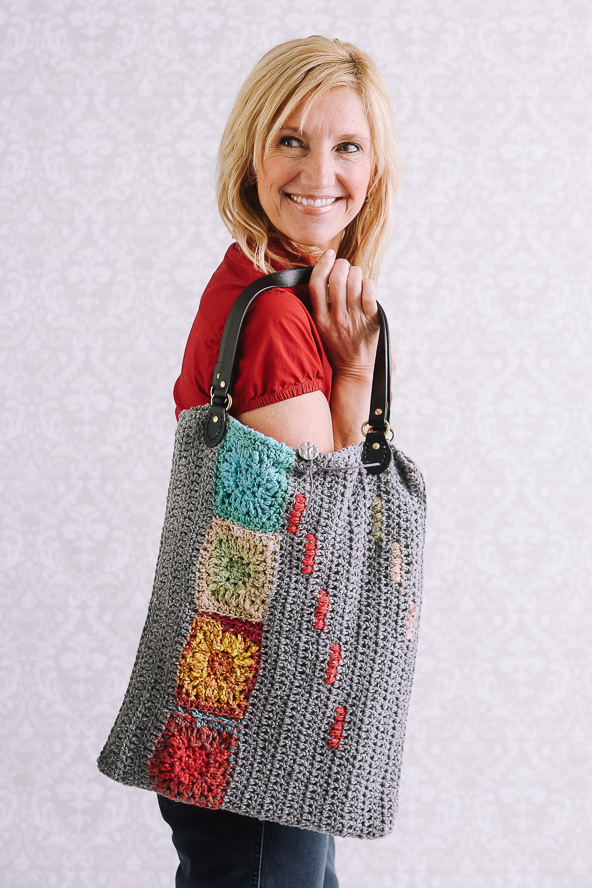
Take this casual, floral beauty with you anywhere you go and always have a sturdy place to keep all your belongings. The Flower Bud Handbag is chic and sturdy with solid leather handles. It is also lined to keep its shape and to provide extra support.
Skill Level: Intermediate
Size: 14 ¼” x 17”
Gauge: Approximately 12 ½ dc = 4” in MC
Materials
Yarn: Berroco Remix (30% nylon, 27% cotton, 24% acrylic, 10% silk, 9% linen; 216 yards [200 meters]/100 grams): #3930 Smoke (MC, 1 skein); Noro Taiyo (40% cotton, 30% silk, 15% wool, 15% polyamide; 216 yards [200 meters]/100 grams): #60 (CC, 1 skein)
Hook: US size H/8 (5.0 mm) hook or size needed to obtain gauge
Notions: Split ring stitch markers, ½ yard fabric, straight pins, 1 pair leather handles, sewing thread in coordinating fabric color, sewing thread in coordinating handle color, sewing needle, tapestry needle, 1” diameter shank button, 12” suede cord
Abbreviations
2hdctog: Two half double crochet together
3Puff: 3puff st
Rsc: Reverse single crochet
Sl st: Slip stitch
Special Stitches
2hdctog: (yo, insert hk in designated st or sp, yo and pull up lp) twice, yo and draw through all 5 lps on hk.
3Puff: (yo, insert hk in st or sp indicated, yo and draw up lp) 3 times, yo and draw through all 7 lps on hk.
Magic Ring: Leaving sufficient amount of yarn to pull (approx. 4-6”), place tail end of yarn behind working yarn to form ring, insert hk from front to back through center of ring, yo with working yarn and pull up a lp.
Rsc: Insert hk in next st to right of hk, yo and draw up lp, yo and draw through all three lps on hk.
Pattern Notes
Individual motifs are created and attached to form a long row; remainder of bag is worked along each edge of motif row; after seaming, a fabric lining is created and stitched into bag; a button and suede cord closure is then added along with leather handles.
Ch 2 at beg of any rnd or row counts as first hdc.
Ch 3 at beg of any row counts as first dc.
When working 3puff sts, float both MC and CC in back of work since bag will be lined.
Pattern
Create Motifs (Make Eight)
Magic ring; ch 2, 7 hdc, sl st in top of initial ch 2, pull tail end of yarn tightening ring to close. (8 hdc)
Rnd 1: *Ch 3, sl st in next hdc, rep from * around, ending with sl st in base of initial ch 3. (8 ch-3 sps)
Rnd 2: *Sl st into next ch-3 sp, (ch 5, sl st, ch 7, sl st, ch 5, sl st) in same ch-3 sp, sl st in next ch-3 sp, (ch 5, sl st) twice in same ch-3 sp, rep from * around, ending with sl st into base of initial ch 5. (4 ch-7 sps, 16 ch-5 sps)
Rnd 3: Sl st into next ch-5 sp, (ch 1, hdc) in same sp,* ch 1, (sl st, ch 3, sl st) in next ch-7 sp (corner made), ch 1, hdc in next ch-5 sp, ch 1, 2 hdctog over next two ch-5 sps, ch 1**, hdc in next ch-5 sp, rep from * around, ending last rep at **, sl st in top of initial hdc. (4 ch-3 corner sps, 4 2hdctog, 8 hdc)
Rnd 4: Ch 2, hdc in next ch-1 sp,* (2hdc, ch 1, 2 hdc) in next ch-3 sp (corner made), 1 hdc in each of next ch-1 sp, hdc, ch-1 sp, 2hdctog, ch-1 sp**, hdc, and ch-1 sp, rep from * around, ending last rep at **, sl st in top of initial ch 2. (44 hdc, 4 ch-1 sps)
Fasten off, leaving a 15” tail.
Block motifs to measurements. Thread yarn into tapestry needle and with ws of each motif facing out, seam motifs together on one side, creating a row of motifs 4” x 16”.
Short Bag Side
Set-up Row: With rs of motif row facing, attach MC with sl st in top left corner ch-1 sp. Ch 3, work 103 dc evenly spaced across motifs. Turn. (104 dc)
Row 1: Ch 2, *hdc in next st, rep from * across row, ending with hdc in top of initial ch 3. Turn. (104 dc)
Row 2: Ch 3, *dc in next st, rep from * across row, ending with dc in top of initial ch 2. Turn. (104 dc)
Rep rows 1 and 2 alternately once, and then row 1 once more. Fasten off.
3Puff St Design
Set-up row: With ws facing, attach MC with sl st in top left corner of motif at ch-1 sp. Ch 3, work 103 dc evenly spaced across motifs. Turn. (104 dc)
Row 1 (RS): Ch 2, hdc in next 6 sts, attach CC, 3puff in next 5 sts, drop CC and pick up MC, hdc in next 80 sts, attach CC, 3puff in next 5 sts, drop CC and pick up MC, hdc in rem 7 sts. Turn. (94 hdc, 10 3puff sts)
Rows 2, 4, 6, 8 (WS): Ch 3, *dc in next st, rep from * across row, ending with dc in top of initial ch 2. Turn. (104 dc)
Row 3: Ch 2, hdc in next 11 sts, pick up CC, 3puff in next 5 sts, drop CC and pick up MC, hdc in next 70 sts, pick up CC, 3puff in next 5 sts, drop CC and pick up MC, hdc in rem 12 sts. Turn. (94 hdc, 10 3puff sts)
Row 5: Ch 2, hdc in next 18 sts, pick up CC, 3puff in next 5 sts, drop CC and pick up MC, hdc in next 56 sts, pick up CC, 3puff in next 5 sts, drop CC and pick up MC, hdc in rem 19 sts. Turn. (94 hdc, 10 3puff sts)
Row 7: Ch 2, hdc in next 25 sts, pick up CC, 3puff in next 5 sts, drop CC and pick up MC, hdc in next 42 sts, pick up CC, 3puff in next 5 sts, drop CC and pick up MC, hdc in rem 26 sts. Turn. (94 hdc, 10 3puff sts)
Rows 1-8 constitute 3puff design. Rep rows 1-6 once more. Fasten off.
Finishing
Weave in ends. Block bag to measurements. Fold bag in half widthwise with rs facing out and, with MC, seam each side closed with a row of sc.
Top Edge
With back of bag facing, attach MC along top edge with sl st in first st directly to right of end of top motif, work 45 rsc around top edge of bag to beg of front bag side motif, fasten off MC and attach CC, work 11 rsc across edge of motif, fasten off CC and attach MC and work 15 rsc around top edge of bag to beg of back bag side motif, fasten off MC and attach CC, work 11 rsc across edge of motif, ending with sl st in initial sl st. Fasten off. Weave in any remaining ends.
Lining
With ruler and pencil and fabric doubled (fold should form bottom edge of fabric), measure and lightly trace lining outline on fabric to dimensions in Schematic B. Cut fabric to dimensions. With WS of fabric facing out, fold in half widthwise and pin along side edges for seam allowance. Starting at bottom fold line, sew ¼” back st seam along each side of fabric. Remove pins and turn lining RS out. You should have a rectangle with bottom and sides closed and top open.
With lining RS out, slip lining onto wrong side of bag. Turn raw, unsewn top edges under in between lining and crochet bag fabric and pin with straight pins along top, with lining fabric even with bag just below rsc row. Using needle and thread, sew lining to bag. Remove pins, and turn bag right side out.
Completing Bag Construction
Sew button to front middle of bag just below rsc edging. Fold suede cord in half and attach to back middle of bag just below rsc edging. Sew leather handles to both sides of bag following Schematic A placement.
I do not see the referenced schematics? Are there attachments?
Hi Melanie! Logged in Gold Members should be able to see a big blue button above the comments section and that’s where one clicks and downloads any available schematics/charts. Please let me know if you have any questions! – Nicola, Editor
Your crocheted bag is very beautiful ????